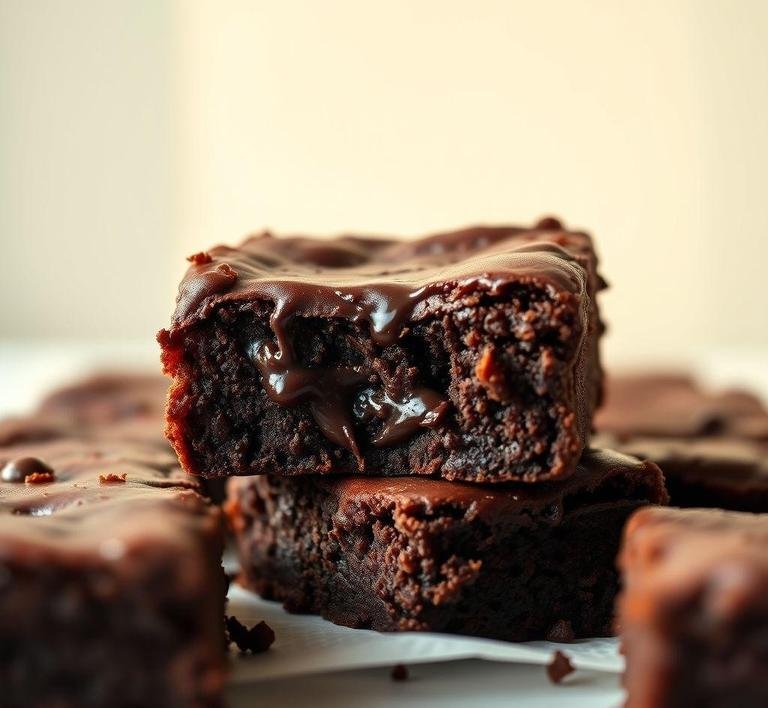
Ah, Everyday Brownies. Just saying the name makes me feel like slipping into my comfiest sweater, lighting a candle and putting the kettle on. These aren’t the kind of brownies you make for show. They’re not the glossy, perfect-edged ones you fuss over before taking to a dinner party. No, these are the sort you make barefoot, on a drizzly Sunday, when you’re wearing a messy bun and your heart just needs something warm and indulgent. something that whispers ’everything”s going to be alright”.
Nigella’s Everyday Brownies come from her book At My Table and they are exactly what they promise to be: a chocolatey balm for the everyday soul. They’re easy, unfussy and generous. The recipe yields a big tray, perfect for sharing (or not sharing. let’s be honest) and the texture? Oh. My. God. That perfect middle ground between fudge and cake. The kind that leaves sticky crumbs on your fingertips and smudges of chocolate in the corner of your mouth. evidence of a very good day.
Nigella Everyday Brownies Recipe
Ingredients Needed
This list is refreshingly short. I didn’t have to sprint to any specialty stores or dig up obscure powders. Everything was either in my cupboard or just down the road at the corner shop. which, to me, is one of the great joys of cooking from Nigella’s books.
Here’s what you’ll need:
- 150g unsalted butter, melted (Nigella suggests soft unsalted butter but melting it brings an extra gooeyness)
- 300g light brown sugar (this gives it that deep, almost caramel-like flavor – don’t substitute this if you can help it)
- 75g cocoa powder (the darker and richer, the better. this is what gives the brownies their depth)
- 150g plain flour (just your everyday flour, nothing fancy)
- 1 tsp bicarbonate of soda
- 1 pinch of salt
- 4 large eggs (room temperature. don’t skip this. Cold eggs can mess with the texture)
- 1 tsp vanilla extract (real vanilla makes a difference. that floral warmth rounds out the chocolate so beautifully)
Optional: Nigella doesn’t load these with nuts or chocolate chunks but I’ve tossed in a handful of chopped walnuts before and it adds a satisfying crunch. Totally your call.
Equipment Needed
No stand mixer. No obscure attachments. Just honest, reliable kitchen tools. and for someone like me, who bakes more with emotion than precision, that’s a blessing.
Here’s what I used:
- A large mixing bowl
- A wooden spoon (or spatula. but I love the ritual of mixing brownie batter by hand)
- A square baking tin, around 23cm
- Baking parchment, for lining (or butter + flour, old-school style)
- A sieve, for dry ingredients
- Measuring scales – baking is science, after all
Also, I keep a small glass of wine nearby when baking these. Not technically equipment but crucial for the overall vibe.
Instructions To Make Nigella Lawson’s Everyday Brownies
This part is almost meditative. I’ve made these with a podcast on, with a sad heart, with friends giggling around the kitchen table. They adapt to every mood.
- Preheat your oven to 190°C (170°C fan). Line your tin with baking parchment. I let the edges overhang so I can lift the brownies out like a tray of treasure.
- Melt the butter, either in the microwave or in a small saucepan. just until it’s liquid, not bubbling. Let it cool slightly so it doesn’t scramble the eggs later.
- In your big mixing bowl, beat together the sugar, cocoa, flour, bicarb and salt. I sift the cocoa to avoid clumps but don’t get too precious about it.
- In a separate jug, whisk the eggs with the vanilla, then pour in the slightly cooled butter.
- Combine the wet and dry ingredients. The batter will look thick and glossy. almost like chocolate mousse. At this stage, I have to physically restrain myself from licking the spoon clean.
- Pour into your lined tin, smooth out the top (Nigella doesn’t stress about perfect swirls and neither do I) and bake for 20-25 minutes. You’re looking for a top that’s set, with a slight wobble in the middle.
- This next step is the hardest: let them cool completely in the tin before cutting. I failed at this the first time. The second time, I sat on my hands. It was worth it.
What I Learnt
Let me tell you something: patience makes brownies better. The first time I baked these, I cut into them while they were still warm. They were gooey and delicious, yes but they lacked structure. The second time, I waited. I made tea. I read a chapter of a book. I distracted myself. When I finally cut into the cooled brownies, they held their shape perfectly – with a fudgey center that felt almost truffle-like. It was like I’d unlocked a secret level.
I also learned that sometimes simplicity is a gift. No fancy frosting. No double boiler. Just really good ingredients and a dash of attention. Nigella’s recipe taught me to trust in the basics. that good food doesn’t always have to come from a culinary high wire act.
FAQs
Can I Make Nigella’s Everyday Brownies Gluten-free?
Absolutely! You can swap the regular flour for a gluten-free blend. Just make sure it’s a 1:1 ratio, and you’ll still get those rich, fudgy brownies we all love. I’ve tried it myself and they turn out just as dreamy!
How Long Do Nigella’s Brownies Last After Baking?
In theory, they can last up to 4 days in an airtight container. But honestly, they rarely make it past 2 in my house! They’re just too good. You could also freeze them for a couple of weeks, but I recommend heating them up a little when you thaw them out, so they’re as gooey as fresh-baked.
Can I Add Nuts Or Other Mix-ins To The Brownies?
Definitely! I’ve added chopped walnuts or hazelnuts to mine and they add a great crunch. You can even throw in a handful of chocolate chips for extra indulgence. Just make sure you don’t overmix; you want those bits scattered in, not blended in too much!