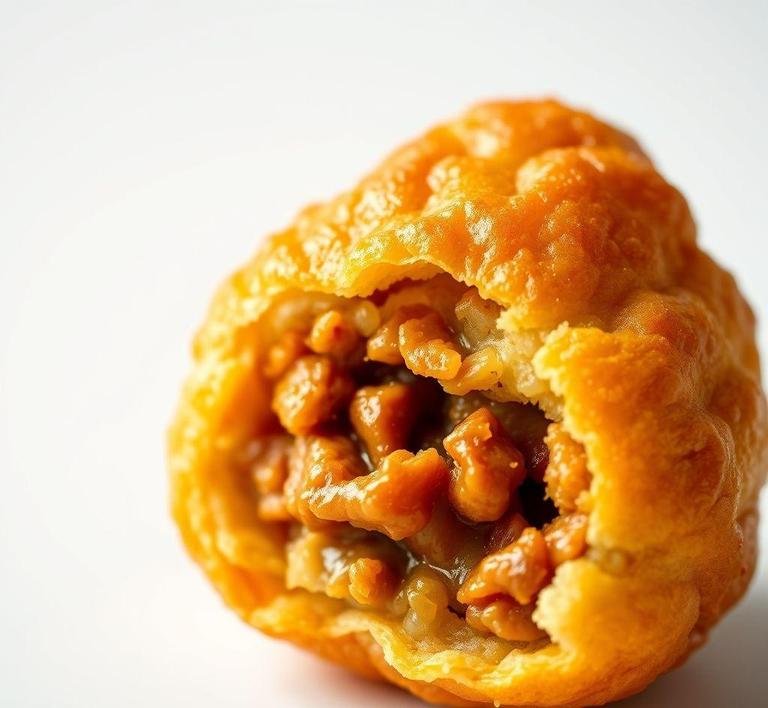
Nigella Lawson’s Coxinha is a modern twist on the classic Brazilian snack and it’s a dish that brings together the world of indulgent comfort food with an adventurous international flair. If you’ve never had the pleasure of tasting coxinha before, think of it as a cross between a croquette and a chicken-filled pastry. It’s crispy, golden on the outside and packed with shredded chicken, seasoned to perfection, inside.
Now, Nigella doesn’t just stick to a traditional recipe; her version brings her signature touch-rich, unashamedly indulgent and just a little bit naughty. In her recipe, she goes all out with extra flavor and texture, making the whole process feel both elegant and cozy at the same time. The coxinha may hail from Brazil but in Nigella’s hands, it becomes an international symbol of comfort. It’s one of those dishes that feels just as good for a special occasion as it does on a lazy Sunday afternoon.
A fun little side note: if you’ve ever been to Brazil, you’ll know that coxinha is everywhere. at bakeries, food carts, cafes. It’s essentially the snack that keeps on giving and Nigella’s take is an homage to this beloved street food with a few thoughtful additions.
Nigella Coxinha Recipe
Ingredients Needed
Before we jump into how Nigella pulls this off, let’s talk ingredients. When I first saw the recipe, I thought it would be complicated or require special, hard-to-find items. But, truth be told, most of what you need is stuff you probably already have in your pantry, with just a few notable items that you can easily find at any grocery store (especially if you have a decent international section).
Here’s what you’ll need:
- Chicken thighs: Nigella uses chicken thighs for richness and trust me, it makes all the difference. Chicken breast can sometimes feel a little dry in this context, so thighs bring the flavor and juiciness you want.
- Onion: This adds sweetness and depth to the filling.
- Garlic: Garlic is the kind of ingredient you throw in and just know things are going to be delicious.
- Coriander (cilantro): This is Nigella’s personal touch, giving the filling a refreshing note. You either love or hate coriander but I think it brings a wonderful brightness to the whole thing.
- Cream cheese: A silky, indulgent addition to the filling. It’s not something you’d typically find in traditional Brazilian coxinha but it’s what gives the filling that rich, creamy texture that makes these a little decadent.
- Flour: For the dough. You want something that can hold together the filling while also crisping up beautifully when fried.
- Butter: A generous amount of butter in the dough makes the outside golden, crisp and perfectly golden brown.
- Eggs and breadcrumbs: To coat and give that beautiful crunchy crust. You want the breadcrumbs to be fine for that perfectly crisp shell.
- Salt & pepper: For seasoning. no dish is complete without these two.
- Chili flakes or powder (optional): This is an optional kick that Nigella adds to the filling for a bit of heat which I wholeheartedly recommend if you like a little spice.
Equipment Needed
You don’t need anything too fancy to make Nigella’s coxinha but there are a few key tools that will make the process easier and more enjoyable. Here’s a quick list:
- Frying pan or deep fryer: Frying is the key step here and the hot oil makes all the difference. If you’re using a pan, just make sure it’s wide and deep enough to fry the coxinhas without overcrowding them.
- Saucepan: For cooking the chicken and making the dough.
- Large bowl: This will help you mix and prepare the dough and the filling. You’ll need space for everything to come together.
- Wooden spoon: You’ll be doing a bit of stirring and this is perfect for both the chicken filling and the dough.
- Spoon or small ice cream scoop: For shaping the coxinhas. These are small, bite-sized treats and the scoop helps you get the right portion every time.
- Frying thermometer (optional): If you want to get the oil temperature just right, a thermometer is handy. The oil should be around 350°F (175°C) for perfect crispness.
Instructions To Make Nigella Lawson’s Coxinha
Here’s where the magic happens. The process of making these coxinhas is part of the fun. it’s not so complex that it feels intimidating but it’s enough of a project that you feel accomplished when you’re done.
- Cook the chicken: Start by simmering your chicken thighs with onion and garlic in a little water. The chicken will get nice and tender and the flavors will meld together. Once the chicken is cooked, shred it using two forks and set it aside.
- Make the filling: In a pan, heat a little oil and sauté onions and garlic until softened. Add the shredded chicken and cook it through, adding a bit of seasoning. Mix in cream cheese for that silky richness and finish with fresh coriander (cilantro). If you like a little heat, this is where you’d add the chili flakes.
- Prepare the dough: In a separate pan, melt butter, then stir in flour, creating a roux. Add some of the chicken stock you’ve used to cook the chicken and keep stirring until it forms a smooth dough. Let it cool enough to handle.
- Shape the coxinhas: Now comes the fun part! Take a small piece of dough (about the size of a golf ball), flatten it into a disc and spoon some of the chicken mixture into the center. Fold the dough over the filling and shape it into a tear-drop shape. It takes a little patience but you’ll get the hang of it.
- Coat and fry: Dip each coxinha into beaten egg, then roll it in breadcrumbs. Heat oil in your frying pan (or deep fryer) and fry the coxinhas until golden brown and crispy, about 3-4 minutes. Place them on paper towels to drain excess oil.
What I Learnt
Making Nigella’s coxinha was a revelation and I’ll tell you why. There’s something about the balance of flavors. the rich chicken filling, the buttery dough and that crispy exterior. that’s honestly a little addicting. What I didn’t expect was how much the cream cheese changes the game. It makes the filling more luxurious than anything I’d had before, adding a creamy element that pairs perfectly with the savory chicken.
I also learned that patience is key in shaping the coxinhas. It can be a little time-consuming but it’s all worth it when you get that first bite. The moment of crunch as you sink your teeth into the crispy coating followed by the burst of rich, flavorful chicken? Totally worth every minute.
FAQs
What Makes Nigella Lawson’s Coxinha Recipe Different From Others?
Nigella brings her own unique twist to this classic Brazilian snack by using shredded chicken mixed with cream cheese, which adds a rich creaminess that balances the spiciness of the filling. She also gives the dough a slightly buttery texture, making it more indulgent than many traditional versions. It’s a fun fusion of flavors that makes the coxinha feel extra special!
Can I Make Nigella’s Coxinha Recipe Ahead Of Time?
Absolutely! You can prepare the coxinha ahead of time and store them in the fridge before frying. In fact, letting them sit for a bit allows the dough to set, and they fry up even crispier. If you want to freeze them, that’s fine too-just pop them in the freezer before frying, and when you’re ready, fry them from frozen. Perfect for unexpected guests or a snack attack!
What Should I Serve With Nigella Lawson’s Coxinha?
Coxinha pairs wonderfully with a fresh, tangy dipping sauce like a homemade salsa or a creamy dip such as sour cream mixed with a bit of lime juice. A side of crisp, leafy salad or even a light fruit salad can balance out the richness. And if you’re really going for the full experience, serve them with a chilled, citrusy cocktail like a Caipirinha for that true Brazilian flair!