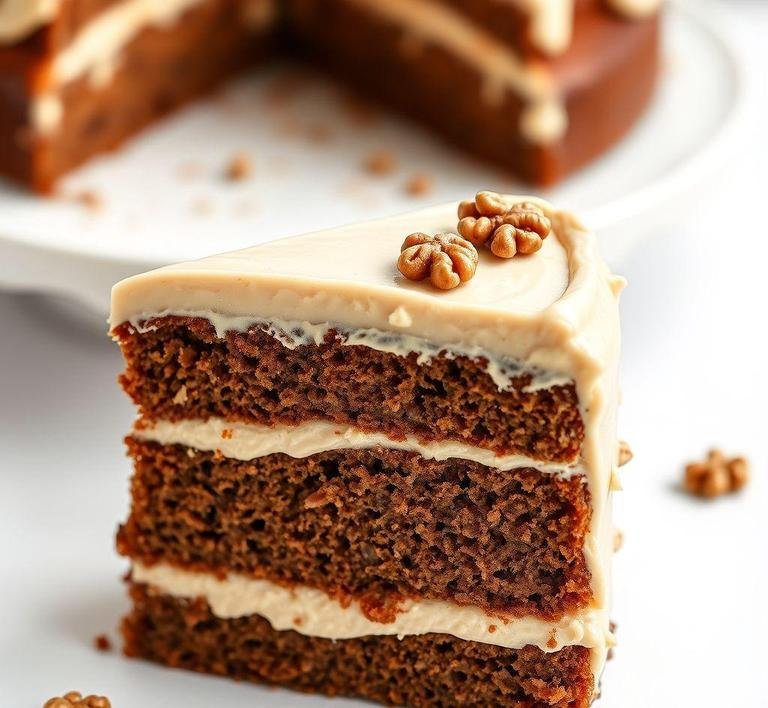
This cake is a beautiful blend of rich, earthy coffee and the subtle crunch of walnuts, all wrapped in the softest, creamiest buttercream frosting. Nigella, being a goddess of effortless elegance in the kitchen, creates a cake that’s indulgent but not too fussy. perfect for a special occasion or, you know, just a regular Wednesday when you need something a little extra.
It’s layered with a coffee-flavored sponge, complemented by the crunch of walnuts in every bite. The frosting is a silky coffee buttercream which makes the entire cake just sing with flavor. I’ve made this cake a few times for birthdays and even random Saturday nights when I’m in the mood to bake. It’s the type of cake that impresses without you breaking a sweat in the kitchen. It doesn’t demand perfection but gives you that ’wow’ factor every time you slice into it.
Nigella Coffee And Walnut Layer Cake Recipe
Ingredients Needed
Let me tell you, when I first made this cake, I was pleasantly surprised by how simple the ingredients were. Nothing too exotic or difficult to find. just the essentials. Here’s what you need:
For The Cake
- Self-raising flour (280g): This is your base. It helps the cake rise and gives it that airy texture you want.
- Unsalted butter (225g): The butter gives the cake its richness. It’s what makes every bite so satisfying.
- Golden caster sugar (225g): For sweetness, with a hint of light molasses flavor. It’s just the right level of sweetness. enough to balance the bitterness of the coffee.
- Instant coffee granules (2 tablespoons): This is the magic ingredient. It gives the cake that beautiful depth of flavor.
- Eggs (4 large): They add structure and moisture to the cake.
- Milk (3 tablespoons): A little milk adds softness and brings everything together.
- Walnuts (100g, chopped): These add texture, making every bite interesting. Walnuts are perfect for this recipe-earthy and slightly bitter.
For The Frosting
- Unsalted butter (225g, softened): The butter is essential to making the frosting smooth and rich.
- Icing sugar (225g): This helps create a perfectly smooth and sweet buttercream.
- Instant coffee granules (2 teaspoons): More coffee but this time, it’s in the frosting for an extra hit of flavor.
- Hot water (1-2 teaspoons): Just a touch to dissolve the coffee granules and make the frosting spreadable.
The thing I love about these ingredients is that they aren’t hard to come by and they come together in a way that feels both familiar and exciting. You’ll likely already have most of them in your pantry.
Equipment Needed
Now, the equipment. It’s not anything too fancy but here’s what you’ll need to get this cake made:
- Two 20cm round cake pans: This is to bake your layers. You’ll want them to be roughly the same size to ensure even baking.
- Mixer (stand or hand): I swear by a stand mixer but a hand mixer will do just as well. This is where the magic happens as it will beat everything into a beautiful, smooth batter.
- Measuring spoons and cups: Nothing too complicated here. Just make sure to measure carefully to keep everything in balance.
- Spatula: To spread that luscious coffee frosting.
- Cooling rack: Let the cake cool completely before you frost it. No one likes a melted frosting situation!
- Baking paper: Line your cake pans with this so the cake doesn’t stick. Trust me on this one.
Instructions To Make Nigella Lawson’s Coffee And Walnut Layer Cake
Now for the fun part-the making! This cake isn’t a one-hit wonder but it’s still super easy to put together.
Step 1: Prepare The Cake Pans
Start by preheating your oven to 180°C (350°F) and lining two 20cm cake pans with baking paper. You want to make sure that the cakes come out easily once they’re done baking.
Step 2: Make The Coffee Mixture
Dissolve your coffee granules in 3 tablespoons of hot water. I like to do this early on and just set it aside while I get everything else ready. The smell of coffee wafting through the kitchen while you’re baking is one of the most satisfying things ever and you’ll be glad you took the time for this step.
Step 3: Mix The Wet Ingredients
In a large mixing bowl (or the bowl of your stand mixer), cream together the butter and sugar until it’s light and fluffy. This takes a few minutes but is totally worth it. Once it’s all fluffy, beat in the eggs one by one. The mixture should start to come together in a smooth, glossy batter. Now, pour in the cooled coffee mixture and mix again until combined.
Step 4: Add The Dry Ingredients
Now for the self-raising flour. You want to fold it in gently, alternating with the milk to keep the batter light. Be careful not to overmix! Once it’s just combined, stir in the chopped walnuts. They’re the little crunchy surprise in every bite and they add so much to the texture.
Step 5: Bake
Divide the batter evenly between your two prepared cake pans. Smooth the tops with a spatula and pop them into the oven. Bake for 25-30 minutes or until a skewer inserted into the center comes out clean. If you’re anything like me, you’ll find yourself anxiously peeking through the oven door, hoping for that perfect rise.
Once done, let the cakes cool in their pans for about 10 minutes, then turn them out onto a cooling rack. Let them cool completely before you frost them. this is crucial.
Step 6: Make The Frosting
While the cakes are cooling, whip up the frosting. Start by dissolving your coffee granules in the hot water and then beat the softened butter with the icing sugar until it’s smooth. Add the coffee mixture and mix until it’s fluffy and easy to spread. If it’s too stiff, just add a little more hot water.
Step 7: Frost The Cake
Place one layer of the cooled cake onto a serving platter. Spread a good dollop of frosting on top and smooth it out evenly. Place the second layer on top and then generously frost the top and sides of the cake. If you’re feeling extra (which I always do), you can decorate the top with more chopped walnuts for that final touch.
What I Learnt
Baking this cake has taught me a lot about patience, flavors and how the simplest recipes often turn out to be the most rewarding. The balance of coffee and walnut isn’t just delicious; it’s comforting. It’s that cake that brings people together over a cup of coffee or is the star of an afternoon tea. It’s one of those recipes that feels like a little gift to yourself and anyone lucky enough to share it with you.
The first time I made this, I was a little worried about the coffee flavor. But trust me, the coffee isn’t overpowering. It’s subtle enough to be enjoyed by those who aren’t normally coffee fans but strong enough to satisfy anyone who craves a coffee-flavored treat. The walnuts provide the perfect contrast in both flavor and texture, making each slice an experience.
FAQs
Can I Make Nigella Lawson’s Coffee And Walnut Layer Cake Ahead Of Time?
Absolutely! I actually recommend baking the cake the day before you need it. The flavors have more time to develop, and it makes assembling the cake way less stressful. Just wrap the layers tightly in plastic wrap and leave them at room temperature. Frosting the cake the next day is a breeze!
How Do I Make The Coffee Flavor Stand Out In The Cake Without Overpowering It?
Great question! Nigella’s recipe calls for instant coffee, which gives it a good balance. But, if you want a deeper coffee flavor, you can try using a stronger brew or even espresso powder. I did this once and it added a really rich depth without being too much. Just don’t go overboard, or the cake might end up feeling more like a coffee cup than a cake!
Can I Substitute The Walnuts If I’m Allergic To Nuts?
Definitely! If you’re avoiding nuts, you could go for something crunchy and textured, like crushed-up biscuits or even a sprinkling of granola. It won’t be exactly the same, but it’ll still have that satisfying crunch. I’ve also made this cake with hazelnuts, which brings a lovely nutty flavor that pairs really well with the coffee.