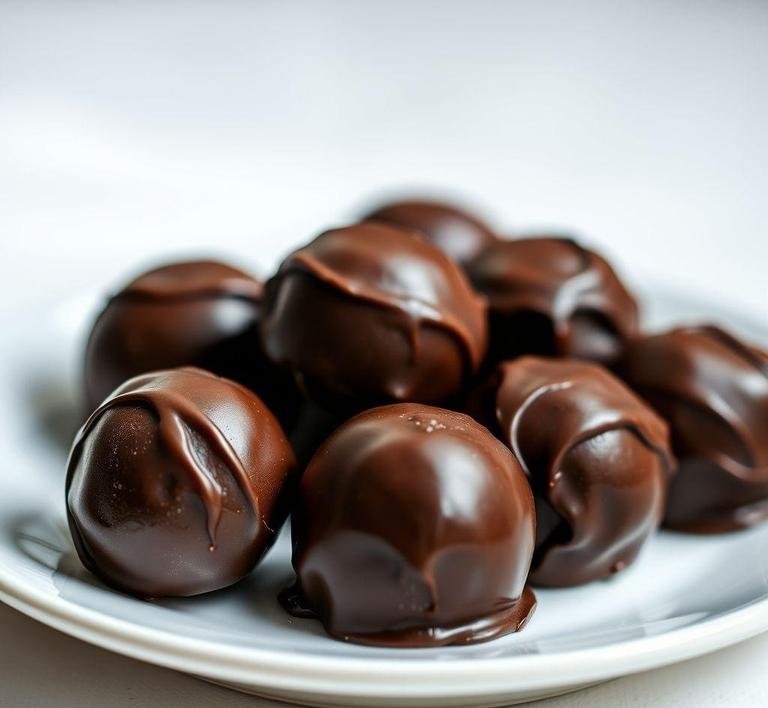
Ah, Nigella Lawson’s Chocolate Truffles… If there’s one recipe that has the magical ability to transform an ordinary day into something a little more indulgent, it’s this one. I first stumbled across this recipe during one of those rainy afternoons when I was craving something decadent but didn’t want to spend hours in the kitchen. You know the kind of day I mean. the kind where you’re craving chocolate but you also don’t feel like wrestling with a complicated recipe. Well, these truffles fit the bill perfectly. They’re incredibly simple but they have that wow factor when you bite into them. It’s like an instant moment of luxury.
Nigella’s truffles are rich, creamy and incredibly smooth, with just the right balance of sweetness and dark chocolate bitterness. What I love most is how easy they are to make; it’s as if she’s unlocked the secret to gourmet indulgence that doesn’t require a masterclass. There’s something timeless about chocolate truffles-they’ve been around for centuries. but Nigella brings her own touch of simplicity and ease. No fuss. Just pure, unadulterated chocolate joy.
Nigella Chocolate Truffles Recipe
Ingredients Needed
The beauty of Nigella’s Chocolate Truffles lies in its simplicity. You won’t need to hunt for exotic ingredients or spend a fortune at a specialty store. Here’s what you’ll need:
- Dark chocolate (70% cocoa). The richness of dark chocolate is key to the flavor profile of these truffles. It provides that deep, intense chocolatey taste that cuts through the sweetness of the cream. Don’t go too low on the cocoa content or you might miss out on that velvety bitterness that elevates the truffles.
- Double cream (heavy cream). This gives the truffles their luxurious, creamy texture. When mixed with the dark chocolate, it creates that perfect truffle consistency.
- Butter – A little knob of butter helps to make the truffles even smoother and adds richness. It’s like a secret weapon in the recipe, making everything taste that much more indulgent.
- Cocoa powder or chopped nuts. For rolling the truffles, you can either go with classic cocoa powder for that smooth, powdery coating or you can use crushed nuts for a bit of crunch. Both options are delicious but I tend to lean toward the cocoa powder when I’m feeling extra classic.
- Optional flavoring – Now, this is where you can get a bit creative! Nigella suggests a splash of brandy or a few drops of vanilla extract for added depth of flavor. I’ve tried both and honestly, I can’t choose a favorite. If you’re feeling fancy, you could even throw in a pinch of sea salt or a dash of orange zest for something different. But, on the flip side, they’re perfectly amazing without any added flavorings.
Equipment Needed
I’ll be honest, you don’t need much. The recipe is wonderfully minimalist, so don’t worry about a long list of gadgets or special tools. Here’s what you’ll need:
- A heatproof bowl – For melting the chocolate. You’ll need this to create a smooth chocolate ganache base for your truffles. If you don’t have a heatproof bowl, a metal bowl works just as well.
- A small saucepan – For heating the cream. It’s best to use low heat so the cream doesn’t burn but the saucepan ensures you’re in control of the temperature.
- A spoon – A simple spoon for stirring everything together.
- A tray lined with parchment paper. This is for setting your truffles once you’ve shaped them.
- Your hands – You’ll be using your hands to shape the truffles into little bite-sized rounds, so no need for anything fancy here!
That’s it, really. Simple but effective. Nigella’s recipes have a way of making you feel like you can’t fail. the tools are basic and so is the method. It’s almost like she’s inviting you to roll up your sleeves and get a little messy in the best possible way.
Instructions To Make Nigella Lawson’s Chocolate Truffles
Now, here’s where the magic happens. These steps are incredibly straightforward and don’t require any kitchen wizardry. just a bit of patience and a love of chocolate!
-
Melt the chocolate and cream:
Start by breaking the dark chocolate into chunks and placing it in your heatproof bowl. In a saucepan, gently heat the cream over low heat until it’s just about to boil. You want it to be steaming but not bubbling. Pour the hot cream over the chocolate and let it sit for a minute or two to soften. Then stir gently until the chocolate is completely melted and smooth. This is your ganache.
-
Add the butter and flavoring (optional):
Stir in a small knob of butter for richness. If you want to add a splash of brandy, vanilla or anything else, now’s the time. Stir until everything is well combined and the ganache is silky.
-
Cool the ganache:
Leave the ganache to cool at room temperature for about 2 hours or pop it in the fridge for about an hour. You’re looking for a consistency that’s firm enough to scoop but still soft enough to roll into balls.
-
Shape the truffles:
Once the ganache has cooled and thickened, it’s time to get your hands dirty! Use a teaspoon or melon baller to scoop out small amounts of ganache, then roll them between your hands into small, round balls. Don’t worry if they’re not perfect. slightly imperfect truffles are actually part of their charm!
-
Coat the truffles:
Roll the truffles in cocoa powder, crushed nuts or any coating of your choice. You could even experiment with a dusting of powdered sugar for a lighter touch. This is the fun part where you can get creative with textures and flavors.
-
Chill and serve:
Place the truffles on a tray lined with parchment paper and refrigerate them for at least 30 minutes or until firm. Once they’ve chilled, they’re ready to be devoured.
What I Learnt
Making Nigella Lawson’s Chocolate Truffles taught me a few things. First, that the beauty of a good recipe is its simplicity. The ingredients are humble but the result is nothing short of luxurious. I also realized how satisfying it is to make something so delicious with minimal effort.
I found myself appreciating the power of quality ingredients. The chocolate you use here is really the star of the show. the 70% cocoa dark chocolate gives the truffles their bold flavor and the cream and butter add the perfect creamy texture. There’s a certain joy in knowing that just a few basic ingredients can come together to create something so decadent.
But more than anything, I learned that making truffles is a tactile experience. It’s a reminder that cooking (and eating) is about more than just following a recipe. it’s about connecting with the food, getting your hands involved and enjoying the process. Every time I make these truffles, I’m reminded of how simple pleasures can be the most rewarding.
FAQs
What Kind Of Chocolate Should I Use For Nigella’s Chocolate Truffles?
Nigella recommends using high-quality dark chocolate for that rich, indulgent flavor. A good rule of thumb is to go for chocolate with at least 70% cocoa solids, but if you’re a milk chocolate lover, you can easily swap it for milk chocolate to match your taste buds.
Can I Make Nigella’s Chocolate Truffles Ahead Of Time?
Absolutely! In fact, they taste even better after they’ve had time to chill and set. Just store them in an airtight container in the fridge. They’ll last for about a week-though they probably won’t last that long with how delicious they are!
Can I Roll Nigella’s Truffles In Something Other Than Cocoa Powder?
Definitely! While cocoa powder is classic, you can get creative. Try rolling them in chopped nuts like pistachios or hazelnuts for extra crunch, or maybe a dusting of powdered sugar for a snowy finish. A sprinkle of sea salt can also add an awesome contrast to the richness.