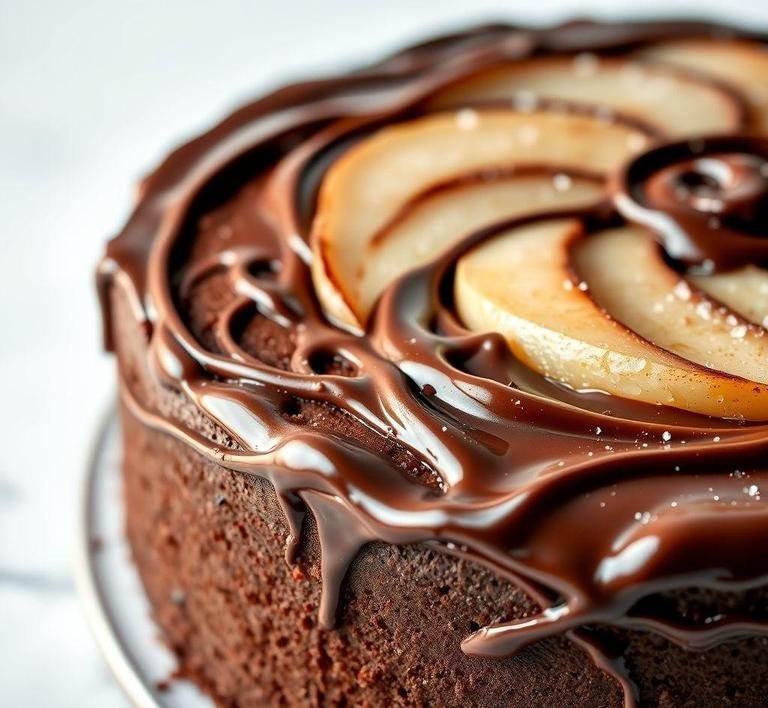
Ah, Nigella’s Chocolate Pear Cake. this dessert is a bit of a hidden gem. If you’ve ever had one of those moments where you crave chocolate but also want something a little lighter, something with just a touch of sophistication, then this cake is exactly what you need. The combination of pears and dark chocolate in this recipe creates something that’s indulgent yet not overwhelming. It’s rich but doesn’t feel too heavy; the moistness of the pears balances the deep flavor of the chocolate.
When I first stumbled across this recipe, it was one of those days when I wasn’t sure if I wanted something comforting or elegant. I was flipping through one of Nigella’s cookbooks and her cake seemed like it was calling to me. The idea of combining chocolate with fruit felt like an unusual twist but in the best way possible. Pears, being naturally sweet and soft when baked, pair so beautifully with the smooth, slightly bitter quality of dark chocolate. The cake feels almost like an upgrade from the usual chocolate cakes that can sometimes be a bit too intense. And that’s the beauty of it. it feels familiar but also a bit special.
The moment I pulled it out of the oven, I knew I was onto something good. The aroma filled the kitchen-rich cocoa with a hint of the fruitiness from the pears. It’s one of those cakes that doesn’t demand attention but gets it anyway, with every slice you cut.
Nigella Chocolate Pear Cake Recipe
Ingredients Needed

Now, let’s get to what you’ll need for this magic. Don’t worry, the ingredients list isn’t too crazy and it’s one of those recipes that doesn’t require anything too fancy. In fact, you’ve probably got most of these ingredients hanging around your kitchen already.
- Pears (around 2 medium-sized): These are key. You want pears that aren’t too ripe but soft enough to bake down into the cake. They add the perfect moistness to the texture of the cake.
- Dark chocolate (around 100g): Nigella uses a good-quality dark chocolate (around 70% cocoa) which gives the cake depth. If you’re like me and can’t resist nibbling on a square or two as you bake, then this is your excuse.
- Butter (200g): You need butter for that lovely richness. You’re not skimping here. go for unsalted butter for control over the salt level.
- Golden syrup (2 tablespoons): This is where things get interesting. Golden syrup adds a gentle sweetness which enhances the overall flavor. If you’re in a pinch, you could substitute with light corn syrup but trust me, golden syrup is the secret weapon in this recipe.
- Dark brown sugar (150g): This gives the cake some of that comforting sweetness, plus a deeper flavor.
- Eggs (3 large): The eggs bind everything together and make the cake nice and fluffy.
- Self-raising flour (200g): This helps the cake rise without needing any extra baking powder or soda.
- Baking powder (a pinch): Just a little extra help to ensure the cake stays light and airy.
- Cocoa powder (3 tablespoons): For the chocolatey richness. No skimping here!
- Vanilla extract (1 teaspoon): Adds warmth and depth to the flavor profile.
- Salt (a pinch): To balance out all that sweetness and bring out the flavors.
That’s it! Simple ingredients but when you put them together, they create something magical.
Equipment Needed
No fancy gadgets here-this is a classic home-baking recipe that requires the basics. I love recipes like this because they don’t ask for anything too complicated. You’ll need:
- A baking pan (23cm round): A standard round cake tin works great. If you don’t have a non-stick one, make sure to line it with parchment paper or grease it well to avoid any sticky moments.
- Mixing bowls: One big one to mix your wet ingredients and a smaller one for the dry ingredients.
- A whisk: To beat the eggs and combine your ingredients smoothly.
- A spatula: You’ll use this to scrape down the sides of the bowl and make sure everything’s well-mixed.
- A saucepan: For melting the butter and chocolate together. A small one works fine.
- A knife: For peeling and chopping the pears.
- A cooling rack: It’s always good to let your cake rest and cool before diving in.
That’s it. A very straightforward list of things you probably already have on hand. This isn’t a ’special occasion’ kind of cake that requires you to dash to the store for obscure ingredients. just a bit of patience and love for the process.
Instructions To Make Nigella Lawson’s Chocolate Pear Cake
The actual method is as straightforward as the ingredient list. This cake is as much about simplicity as it is about bringing together a few components that complement each other beautifully.
- Preheat your oven to 180°C (160°C fan oven). Grease and line your cake tin with parchment paper. This is crucial if you want to avoid a cake catastrophe. Trust me.
- Melt the butter and dark chocolate together. I usually do this in a saucepan over a low heat. Keep stirring to avoid burning the chocolate and once it’s all melted, take it off the heat to cool slightly.
- Peel, core and chop the pears. This step always makes me think of my grandmother, who would always say, ’A pear”s got a soul to it”. She loved making things from scratch and peeling pears felt like a ritual. Anyway, chop them into small chunks.
- Beat the eggs and sugar together until light and fluffy. This is where you get that lovely texture in the cake, so don’t rush this step. The eggs and sugar should be pale and a bit thickened.
- Mix in the melted chocolate-butter mixture, vanilla and golden syrup. You can’t help but feel a bit excited at this point, right? The kitchen smells heavenly. Fold in the flour, cocoa powder, baking powder and a pinch of salt.
- Add the chopped pears and fold them in gently. This is the moment when you realize that the pears really do make the whole thing come together. The batter might feel a bit thick but that’s exactly how it’s supposed to be.
- Pour the batter into your prepared tin. Spread it out evenly and then pop it into the oven. Bake for about 45 minutes or until a skewer comes out clean. I always test it in the middle of the cake, just to be sure.
- Cool and enjoy. The hardest part is the waiting. Let the cake cool in the tin for about 10 minutes, then transfer it to a cooling rack. Once it’s fully cool, you can dust it with a little icing sugar or cocoa powder for that perfect finishing touch.
What I Learnt
The first time I made this cake, I was surprised by how simple it was and how quickly it came together. There was something about the way the chocolate melted and mingled with the pears. it felt like an almost alchemical process. What really stood out, though, was the balance. Often, fruit and chocolate can clash but here, the pears complement the chocolate, adding moisture and lightness to the richness of the cocoa.
Another thing I learned: patience pays off. The cake looks so unassuming when it’s in the tin and yet once you cut into it, you realize it’s a little piece of magic. The pears make it incredibly moist and the chocolate isn’t overpowering. it’s just the right amount. And the texture? It’s dense but soft, almost like a brownie but with the added elegance of the pears.
Lastly, this cake taught me the power of simplicity. You don’t need a complicated recipe to make something showstopping. Sometimes, the beauty of a cake lies in how effortlessly it comes together.
FAQs
Can I Use A Different Fruit Instead Of Pears In Nigella’s Chocolate Pear Cake?
Absolutely! While the pears really add a lovely moisture and subtle flavor, you can easily swap them for other fruits like apples or even roasted plums. I once used quinces and it turned out surprisingly delicious!
Is The Chocolate Pear Cake Gluten-free?
No, it’s not naturally gluten-free. But I’ve tried making it with a gluten-free flour blend, and it worked out pretty well. The texture was a bit different, but still moist and rich. If you’re going gluten-free, make sure to check your baking powder too!
How Long Will The Cake Last After Baking?
It’s actually better after a day or two! The flavors meld together and the cake stays wonderfully moist. I’ve had it last up to 4 days on the counter (covered, of course) and it was still amazing, though I can’t say it ever lasted much longer because we devoured it!


