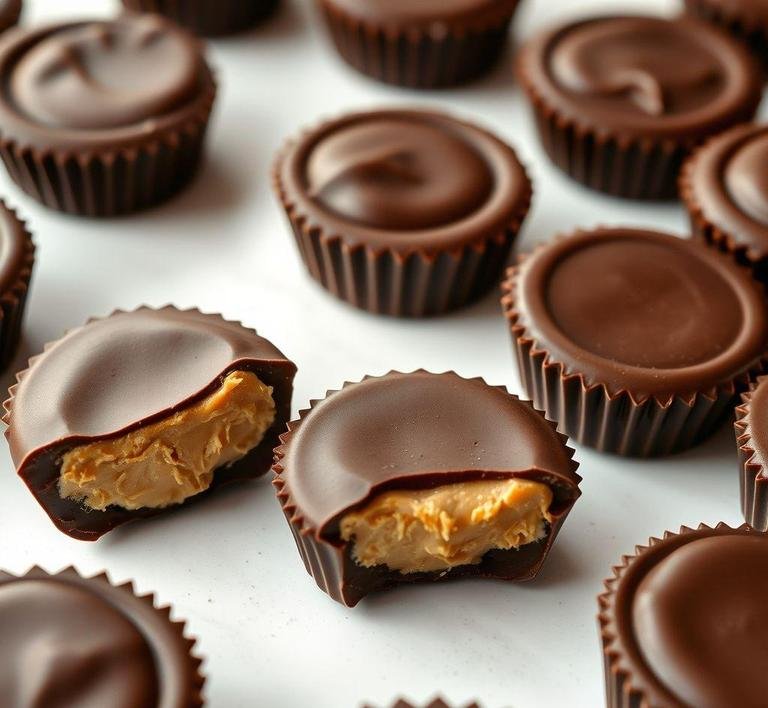
So, imagine this: you’re in the middle of a cozy evening, maybe you’re binge-watching your favorite show or just wrapping up a long day. You’ve got the craving for something sweet but not just any sweet. You want something rich, indulgent and that gives you that instant hit of comfort. Enter Nigella Lawson’s Chocolate Peanut Butter Cups. They’re not just a dessert. they’re like a personal hug in treat form.
Now, Nigella Lawson, who’s basically a household name when it comes to indulgent, effortless recipes, brought us these beauties. She’s not just about creating dishes that taste incredible but also making it all feel so attainable. These peanut butter cups are the perfect balance of sweet and salty, creamy and crunchy, all wrapped up in luscious chocolate. It’s a nostalgic throwback to those Reese’s cups we all know and love but they’re elevated in the best possible way. They’re homemade, so you’re in complete control of the quality and flavor and trust me, that makes all the difference.
There’s something magical about the way Nigella combines ingredients and this recipe is no exception. You’re using just a few ingredients, yet the result feels like you’ve put way more effort into it than you actually did. The creamy peanut butter blends seamlessly with smooth, melt-in-your-mouth chocolate, creating a dessert that feels like luxury. If I’m being honest, this recipe has become one of my go-tos when I’m looking for something that feels a little more special but doesn’t require me to be in the kitchen for hours.
Nigella Chocolate Peanut Butter Cups Recipe
Ingredients Needed
The thing I love about this recipe is how simple and accessible the ingredients are. There’s no need for any fancy stuff or obscure items that you’d probably only use once and forget about. It’s just the good stuff you’d typically have in your pantry. Here’s what you’ll need:
- Peanut Butter: The star of the show! You can’t skip this part. Look for smooth peanut butter-creamy, not crunchy, unless you want a bit of extra texture. I’ve tried both types and honestly, the smooth peanut butter creates that perfect silky filling.
- Icing Sugar (Powdered Sugar): This gives the peanut butter mixture its sweet, smooth consistency. You want it to be just sweet enough but not overpowering.
- Butter: Not much but it’s what helps bind everything together and adds that creamy richness.
- Dark Chocolate: For the coating. Dark chocolate gives that lovely, slightly bitter contrast to the sweet, salty peanut butter but if you’re a milk chocolate fan, you can swap it in. I’ve made it with both and it’s heavenly either way.
- Vanilla Extract: Just a small amount but it elevates the flavor of the peanut butter and adds depth.
Equipment Needed
This is where Nigella’s ’no-fuss’ approach really shines through. There’s no need for any fancy gadgets or special equipment. just a few basics and you’re good to go.
- A Microwave or Double Boiler: To melt the chocolate. If you’re using the microwave, just be sure to go slow with short bursts to avoid burning the chocolate.
- A Bowl: For mixing the peanut butter filling.
- A Muffin Tin: This is what makes them cups, after all. I typically use a 12-cup muffin tin to make a batch that’s perfect for sharing (or not, if you’re me).
- Paper Muffin Liners: These make the whole thing easier to remove after the chocolate has set and they give the cups that nice, neat finish.
- A Spoon or Ice Cream Scoop: For portioning out the peanut butter mixture into the muffin cups. I actually use a little ice cream scoop for consistency. it makes everything even and less messy.
Instructions To Make Nigella Lawson’s Chocolate Peanut Butter Cups
Okay, now let’s dive into the actual magic of making these. When I first tried this recipe, I honestly couldn’t believe how simple it was. It’s one of those moments where you’re like, ’Why haven”t I been making these my whole life”? Here’s how you do it:
- Prep the Muffin Tin: Start by lining your muffin tin with paper liners. This will help you get the perfect shape for each cup and makes cleanup a breeze.
- Melt the Chocolate: Chop up your dark chocolate into smaller pieces. You can either melt it in the microwave (20-second bursts, stirring in between) or use a double boiler. I usually go for the microwave because it’s faster but both methods work perfectly. Once melted, set it aside for a moment to cool slightly.
- Mix the Peanut Butter Filling: In a separate bowl, combine your peanut butter, softened butter and vanilla extract. Stir until everything’s smooth and combined. Gradually add the powdered sugar and keep mixing until the mixture is thick and creamy.
- Layer the Chocolate: Now comes the fun part. Spoon a little bit of the melted chocolate into the bottom of each muffin liner, just enough to cover the base. Pop the tin into the fridge for about 10 minutes to let the chocolate firm up.
- Add the Peanut Butter: Once the chocolate base has set, spoon a little dollop of the peanut butter mixture onto the chocolate layer, spreading it out evenly.
- Finish with More Chocolate: Pour the remaining melted chocolate over the peanut butter, making sure it covers the entire top. Give the tin a gentle tap to smooth it out and make sure there are no air bubbles.
- Chill and Set: Pop the whole thing into the fridge again and let them set for at least an hour (but I usually leave them for longer because the waiting game is real). Once set, they’re ready to enjoy!
What I Learnt
Making Nigella’s Chocolate Peanut Butter Cups taught me a lot about the beauty of simplicity. You don’t need to overcomplicate things to create something amazing. Sometimes, the simplest ingredients, when combined in the right way, can produce the most satisfying results. The chocolate-peanut butter combo is pretty classic for a reason. it’s the ultimate comfort food that never gets old.
Also, I learned that patience is key. You can’t rush the setting process. Trust me, I’ve tried. You want that beautiful snap when you bite into them, so giving them time to firm up in the fridge is essential. If you can resist the urge to dive in immediately, they taste even better the next day, once the flavors have really melded.
FAQs
How Do I Make Nigella Lawson’s Chocolate Peanut Butter Cups Without Them Being Too Sweet?
If you find her recipe a bit too sweet, you can adjust the sugar by using dark chocolate with a higher cocoa percentage. I love going for something around 70%, which balances the sweetness of the peanut butter filling perfectly without overpowering it. You could also reduce the amount of powdered sugar in the peanut butter mix if you prefer less sweetness overall!
Can I Use Almond Butter Instead Of Peanut Butter In Nigella’s Recipe?
Absolutely! I’ve tried it with almond butter before, and it works beautifully. It gives the cups a slightly different flavor-less salty than peanut butter, but still rich and creamy. If you’re into almond butter, it’s a great option to switch things up. Just make sure your almond butter isn’t too runny, or it might affect the consistency of the filling!
How Long Do Nigella’s Chocolate Peanut Butter Cups Last In The Fridge?
They last about a week in the fridge, but honestly, they never last that long in my house! If you’re making a big batch, you can also freeze them. Just let them cool completely and store them in an airtight container in the freezer. They’ll stay good for about a month, and they’re still just as delicious straight from the freezer!