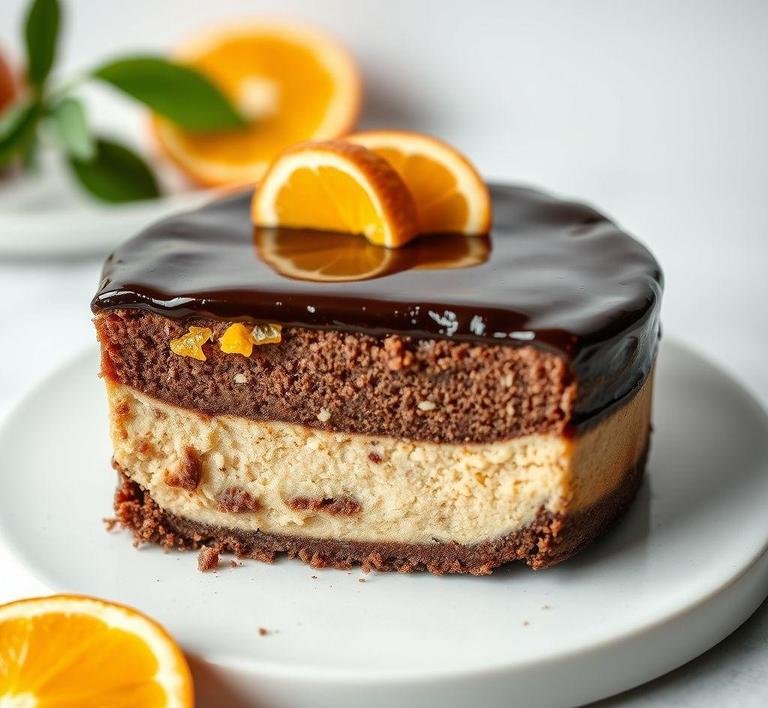
Nigella Lawson’s Chocolate Orange Cheesecake is like a love letter to anyone who enjoys rich, indulgent desserts with a zesty twist. Picture this: a silky, creamy cheesecake base that’s velvety and just sweet enough, sitting on top of a crunchy, buttery biscuit crust. The magic happens with the addition of the chocolate and orange combination. It’s a classic flavor pairing and Nigella has perfected it in this recipe, bringing together the richness of dark chocolate and the brightness of orange in the most luxurious way.
The cheesecake itself has that perfect balance of creaminess and density but it’s never too heavy. The chocolate and orange flavors which are infused into both the filling and the topping, elevate the dessert to a level of sophistication that makes it feel like a treat you’d only find at a fancy dinner party, yet it’s surprisingly simple to make.
Honestly, this cheesecake feels like an elevated version of the classic cheesecake we all know and love but with an unforgettable twist. The contrast between the smooth, almost mousse-like filling and the sharp citrusy tang from the orange zest creates a beautiful harmony. I can remember the first time I tried it. I was blown away by how such simple ingredients could create something so deeply satisfying.
Nigella Chocolate Orange Cheesecake Recipe
Ingredients Needed
The ingredient list for Nigella’s Chocolate Orange Cheesecake might seem long at first but trust me, it’s worth every bit of effort to track them all down. Once you get everything together, it’s mostly about assembly.
For The Biscuit Base
- 250g digestive biscuits – These provide the perfect texture for the crust and if you’re looking for something with a little extra flavor, you can swap them for bourbon biscuits but I personally stick to digestives for that traditional crunch.
- 75g unsalted butter – Melted, this helps bring the biscuits together and gives them that buttery richness.
For The Filling
- 700g full-fat cream cheese – Yes, it’s a lot but it’s the key to a rich, creamy filling that isn’t too sweet. Go for the block cream cheese, not the spreadable kind.
- 200g dark chocolate (70%). The dark chocolate is where the real depth comes from. If you want it less intense, you can go for a milk chocolate but I find the bitterness of dark chocolate balances so beautifully with the orange zest.
- 250g sour cream – This gives the cheesecake its creaminess but with a little tang which contrasts with the sweetness and chocolate.
- 150g icing sugar – For a smooth, delicate sweetness without making it overpowering.
- 2 tbsp orange zest. This is the game changer! It’s the reason the cheesecake tastes so fresh and fragrant.
- 1 tbsp orange liqueur (optional) – Nigella suggests using Cointreau but if you want to keep it alcohol-free, you can skip this without losing the essence of the flavor.
For The Topping
- 100g dark chocolate (again, 70%) – This is for that glossy chocolate layer that sits on top and it really gives the cake that show-stopping, indulgent look.
- 1 tbsp orange zest. A little extra zest to top it off and give a pop of color and flavor.
Equipment Needed
You don’t need any fancy kitchen tools to make this cheesecake. just a few basics will do the job. But there are a couple of things I would recommend having, because they make the process so much easier.
- A 23cm springform pan. A springform pan is essential for cheesecakes because it allows you to easily remove the sides without messing up the delicate structure of the cake.
- Food processor or rolling pin. Either works for crushing the biscuits but I love using a food processor because it gives you a super fine crumb that’s easy to work with. If you don’t have one, a rolling pin and a plastic bag will do the trick!
- Hand whisk or stand mixer. If you don’t have a stand mixer, you can still make this with a hand whisk, though it might take a bit longer to get that creamy, smooth consistency.
- Heatproof bowl and saucepan. You’ll need these to melt the chocolate. A double boiler method works best to avoid overheating the chocolate.
- Spatula and spoon – To help fold in the ingredients and smooth everything out.
Instructions To Make Nigella Lawson’s Chocolate Orange Cheesecake
1. Prepare The Base
Start by preheating your oven to 180°C (160°C fan-assisted). Take your digestive biscuits (or whatever you’re using) and crush them into fine crumbs. You can do this in a food processor or if you’re like me, pop them in a ziplock bag and bash them with a rolling pin until they’re finely crushed. Melt the butter in a saucepan or microwave and then combine it with the crushed biscuits. Press this buttery biscuit mix into the base of your springform pan, making sure it’s compact and even. Pop this into the oven for about 10 minutes to firm up the crust, then let it cool while you work on the filling.
2. Make The Cheesecake Filling
Next, chop the dark chocolate into small pieces and melt it over a double boiler (a heatproof bowl over a saucepan of simmering water) or in the microwave in short bursts. Once it’s melted and smooth, set it aside to cool slightly.
In a large bowl, use a stand mixer or hand whisk to beat the cream cheese until it’s soft and smooth. Add the sour cream, icing sugar, orange zest and melted chocolate and continue mixing until everything is fully combined. You’ll want a glossy, creamy filling here, so make sure there are no lumps.
If you’re using orange liqueur, add it now. I usually leave it out but it definitely adds another layer of flavor if you like a boozy twist.
3. Assemble The Cheesecake
Pour the creamy filling over the cooled biscuit base and use a spatula to smooth it out into an even layer. You can either leave it plain or chill it for a few hours in the fridge but I highly recommend letting it set overnight for the flavors to develop.
4. Add The Chocolate Topping
Once the cheesecake has chilled, it’s time to make the glossy chocolate topping. Melt the remaining dark chocolate and pour it over the chilled cheesecake, spreading it out evenly. Sprinkle the extra orange zest over the top and if you like, you can even add a few small chocolate shavings for a little extra flair.
5. Let It Set And Serve
Place the cheesecake back in the fridge for at least another hour to let the topping firm up. When you’re ready to serve, carefully remove the sides of the springform pan. Cut yourself a slice (or two) and enjoy that perfect balance of smooth, chocolatey richness and bright, citrusy orange.
What I Learnt
The first time I made this cheesecake, I was a little intimidated. It sounded like it would be a lot of work. you know, like one of those desserts that looks gorgeous but ends up being a total disaster in your kitchen. But honestly, it’s surprisingly straightforward. The biggest takeaway for me was how key it is to let everything chill for enough time. The flavors really develop when you let the cheesecake sit overnight and that’s when you get that perfect combination of creaminess and tang.
Also, the chocolate and orange pairing is a revelation. It’s not overly sweet but it’s indulgent enough to feel like a special treat. The zest adds brightness while the chocolate gives it that deep, satisfying richness.
FAQs
What Makes Nigella Lawson’s Chocolate Orange Cheesecake So Special?
It’s the perfect balance of rich chocolate and zesty orange, with that smooth, creamy cheesecake texture. Nigella has this magic way of making it all feel super luxurious but also simple enough to make at home. The crust has a buttery crunch, and the chocolate-orange filling is a total showstopper.
Can I Make Nigella’s Chocolate Orange Cheesecake Ahead Of Time?
Definitely! In fact, it’s even better if you let it set for a day or two. The flavors have time to meld together, and the cheesecake has a firmer texture that makes slicing easier. Just keep it in the fridge, and you’re good to go!
What Can I Substitute If I Don’t Have Orange Liqueur For The Cheesecake?
No worries! You can swap in orange juice and a bit of zest if you prefer a non-alcoholic version. If you still want a hint of that grown-up citrus kick, a splash of orange extract works wonders too. Just don’t overdo it-it’s all about balance!