Have you ever had that moment where you taste something so decadent that it transports you to a cozy, wintery day filled with the smell of spiced desserts, maybe even a little snowfall outside? That’s what Nigella Lawson’s Chocolate Fruit Cake does to me every time I make it. It’s the perfect marriage between a traditional fruit cake and a modern twist with rich chocolate. It’s a dessert that’s both indulgent and comforting, perfect for holidays, celebrations or even as a treat on a random Tuesday afternoon (don’t judge me, I’ll take chocolate cake when I can get it).
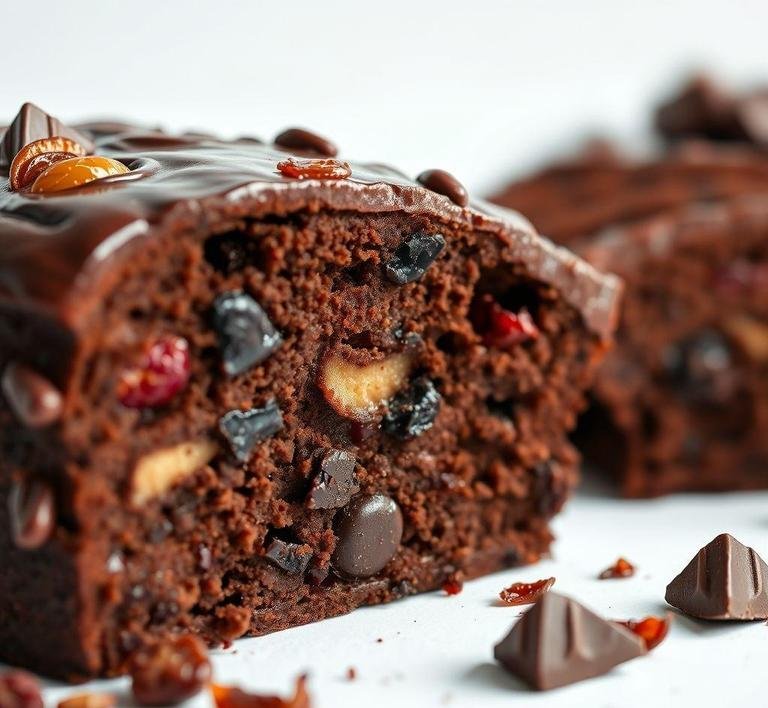
Nigella’s version of this cake isn’t overly dry like some fruit cakes tend to be. Instead, it’s moist, rich and deliciously dark, combining a gorgeous mix of dried fruits like prunes, apricots and raisins, paired with a deep cocoa flavor that enhances everything. It’s like the kind of cake you want to slice and savor slowly, perhaps with a cup of tea on a quiet afternoon or after a holiday feast. It’s a cake that feels like a hug, both in flavor and in the amount of time and love that goes into making it.
I’d say the best thing about this cake is that it gets better with age, just like the best fruitcakes do. But unlike many fruitcakes that can be a bit too boozy or dense, this one has that luscious richness without it being over the top. And honestly, I think it’s because of Nigella’s approach. she blends her ingredients in a way that keeps the cake moist without making it too heavy.
Nigella Chocolate Fruit Cake Recipe
Ingredients Needed
Before I dive into the actual recipe, I need to say something: the ingredients for Nigella’s Chocolate Fruit Cake are pretty straightforward. But trust me, once you mix them all together, magic happens. Here’s what you’ll need:
- Butter: You’ll want unsalted butter for that perfect richness. You can’t skip the butter. it’s what makes the cake so soft and indulgent.
- Dark Brown Sugar: This is essential for that deep, caramelized sweetness. It gives the cake its darker color and earthy sweetness. White sugar just wouldn’t cut it.
- Golden Syrup: If you’ve never used golden syrup before, you’re in for a treat. It adds a unique sweetness and depth that you can’t quite get from honey or corn syrup. It’s a must-have in this recipe.
- Dark Chocolate: The richer the better. I personally love using a high-quality dark chocolate (at least 70% cocoa) because it gives the cake its deep chocolatey flavor.
- Dried Fruits: This is where you can get creative. Nigella suggests a mix of raisins, prunes, apricots and dates. The combo of these fruits gives the cake complexity and a nice chewiness. But, feel free to swap out the fruits if you’re not a fan of something in the mix.
- Spices: Ground cinnamon and nutmeg are the classic warm spices used here. The fragrance that wafts through the kitchen as you bake is enough to make you want to curl up on the couch with a slice and a blanket.
- Flour & Baking Powder: Pretty standard but important for that perfect cake texture.
- Eggs: I’d recommend room temperature eggs to get the best consistency.
- Boiling Water: A little trick Nigella uses to make the batter extra smooth. It helps incorporate the melted butter and chocolate seamlessly.
That’s the foundation of the cake but it’s the balance of these ingredients-particularly the dark chocolate with the dried fruits. that makes it so special. You’ll notice how each bite gives you that fruity burst followed by a rich chocolate aftertaste. It’s like a cake version of a luxury dessert.
Equipment Needed
Ok, so here’s the thing: you don’t need a fancy set of gadgets for this. Just a few essentials will do. Here’s what I typically use:
- Two Mixing Bowls: You’ll need one for your wet ingredients and one for your dry. I like to separate them so that everything mixes well without overworking the batter.
- Whisk and Wooden Spoon: A whisk for beating the eggs and the sugar together and a wooden spoon for folding in the dry ingredients and fruits. Nothing too fancy, just classic tools.
- 9-inch Round Cake Tin: This is my go-to size for this recipe. It’s the perfect size for the cake to bake through evenly. Make sure to line the tin well with parchment paper or grease it so it doesn’t stick.
- Baking Tray: Place your cake tin on this to catch any possible drips. It makes transferring the tin to the oven much easier.
- Cooling Rack: After baking, let the cake cool completely on a rack. This prevents it from becoming soggy and it gives it time to firm up.
It’s a pretty simple setup and that’s what I love about it. Sometimes, baking can feel like you need a million tools but with Nigella’s Chocolate Fruit Cake, you can keep it relaxed and still come out with a showstopper.
Instructions To Make Nigella Lawson’s Chocolate Fruit Cake
- Prep the Oven and Tin: Start by preheating your oven to 325°F (170°C). Grease and line your 9-inch cake tin with parchment paper. I usually double line mine for good measure. It makes the cake come out effortlessly.
- Melt the Butter and Chocolate: In a pan, melt the butter and dark chocolate together on low heat. You can also do this in the microwave but make sure you go slow-burnt chocolate is a sad thing. Once melted, set aside to cool a little.
- Mix the Wet Ingredients: In a large bowl, beat the eggs and sugar together until creamy and fluffy. This step adds air to the cake which helps it stay moist without being too dense.
- Combine the Boiling Water & Syrup: In another bowl, stir together the boiling water and golden syrup. It’ll get a bit frothy but that’s what you want.
- Incorporate the Wet Ingredients: Add the syrup-water mixture and the melted chocolate-butter mixture to the eggs and sugar. Stir well to combine.
- Add Dry Ingredients and Fruits: Sift the flour, baking powder and spices into the bowl and fold them in. Once the dry ingredients are incorporated, stir in the dried fruits. The batter should be thick and sticky but well mixed.
- Bake: Pour the batter into your prepared tin and bake for about 1 hour 30 minutes or until a skewer comes out clean (or with just a few crumbs attached). The cake might crack slightly on top but that’s all part of the charm.
- Cool: Let the cake cool in the tin for 15 minutes before transferring it to a cooling rack. Don’t be too eager to slice it. let it rest. It’ll set better this way and allow the flavors to meld.
What I Learnt
Making Nigella Lawson’s Chocolate Fruit Cake is more than just following a recipe. It’s about letting go of the stress and enjoying the process. I’ve made this cake for a few years now and with every bake, I learn something new. The first time, I was too eager to cut it and didn’t let it cool properly. The result? A delicious but slightly crumbly cake. The second time, I learned the magic of letting it age for a few days. The flavors deepen and it becomes even more delicious.
Another thing I learned? Patience. It’s easy to rush through the baking but this cake deserves attention. Letting it cool, resisting the urge to slice it immediately and allowing the flavors to blend really pays off. I also learned that sometimes, baking isn’t about getting everything perfect. it’s about creating something that brings you joy. Even when a cake might not come out as you expect, it can still be delicious and that’s what makes it fun.
FAQs
How Long Does Nigella Lawson’s Chocolate Fruit Cake Need To Bake?
Nigella’s chocolate fruit cake usually takes about 2 hours to bake at 150°C (300°F). Make sure to check it with a skewer towards the end-it should come out clean when the cake is done.
Can I Use A Different Type Of Dried Fruit In This Chocolate Fruit Cake?
Absolutely! Nigella’s recipe is pretty flexible. While she uses a combination of mixed dried fruits, you can swap in your favorites-like dried apricots, cherries, or even cranberries, depending on what you have or prefer.
Can I Make Nigella’s Chocolate Fruit Cake Ahead Of Time?
Yes! In fact, it tastes even better after a few days because the flavors really meld together. You can make it up to a week ahead, and just store it in an airtight container. It even keeps well for up to a month if you freeze it!