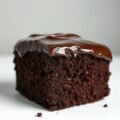
Nigella Lawson’s Chocolate Fondant is like the warm, gooey hug of the dessert world. It’s an indulgent treat that’s deceptively simple to make but gives off this luxurious vibe that will have your guests thinking you’ve spent hours slaving away in the kitchen (when in reality, you’ve probably spent less than 30 minutes). The magic happens as it bakes: the outer layer forms a delicate, soft crust while the inside stays wonderfully molten and gooey, almost like a rich, velvety chocolate lava.
Every bite feels like you’re diving into a chocolate dream-rich, comforting and oh-so-decadent. There’s something nostalgic about it, too, kind of like sinking into your favorite chair after a long day. It’s not a fancy or complicated dessert; it’s straightforward but it delivers on flavor every single time.
What I love about Nigella’s version, though, is how she manages to turn a somewhat intimidating dessert (because, let’s be real, any time you see ’lava’ in a recipe, there’s some serious pressure) into something totally approachable. She’s one of those chefs who makes you feel like you can pull off a restaurant-quality dessert in your own kitchen without breaking a sweat.
Nigella Chocolate Fondant Recipe
Ingredients Needed

The beauty of Nigella’s Chocolate Fondant is that it doesn’t require a bunch of fancy ingredients you might never use again. It’s straightforward and relies on the essentials that you probably already have in your kitchen. Here’s what you’ll need:
- Dark chocolate (the good stuff, ideally with around 70% cocoa solids)
- Butter (unsalted, to give you control over the salt)
- Eggs (large, free-range if you can swing it; they make a difference in texture)
- Caster sugar (the fine stuff, not the granulated kind)
- Self-raising flour (this is the magic behind the slightly airy outside while the inside stays gooey)
- Vanilla extract (don’t skip this, it enhances the chocolate’s depth)
- Pinch of salt (yes, salt! It intensifies the chocolate flavor. trust me on this one)
There’s something so comforting about how these simple ingredients come together, isn’t there? It’s not some obscure list that requires trips to specialty shops. I remember the first time I made this, I was almost giddy realizing that these are things I’d already had in my pantry and they would soon be transforming into something indulgent and perfect.
Equipment Needed
You don’t need any special gadgets or elaborate setups for this recipe-Nigella keeps it real. Here’s what you’ll need:
- Ramekins (small, sturdy ones, ideally around 6oz, so that the fondants have enough space to rise and form that perfect molten center)
- Mixing bowls (one for the chocolate mixture, one for eggs and sugar)
- Whisk (to beat the eggs but honestly, a hand-held electric mixer makes life way easier)
- Spoon (for filling the ramekins, of course)
- Baking tray (because ramekins need a little flat surface to sit on while they bake evenly)
- Oven (yeah, that’s kind of a given but we’ll go with it!)
You could get all fancy with silicone molds or non-stick pans but really? I like to stick with classic ramekins. There’s something almost comforting about how cozy they look and they’re the perfect size for single servings. They help the fondant cook evenly without too much fuss.
Instructions To Make Nigella Lawson’s Chocolate Fondant
- Preheat the oven to around 200°C (or 180°C if you’re using fan-forced) and butter your ramekins generously. I like to sprinkle a little flour inside too, just to make sure the fondants come out easily once they’re baked.
- Melt the chocolate and butter: In a heatproof bowl, break up your dark chocolate and add the butter. Gently melt them together over a pan of simmering water (double-boiler style) or in the microwave. If you microwave, do it in short bursts of about 30 seconds to avoid burning the chocolate. Stir until it’s all smooth and glossy, then set it aside to cool slightly.
- Beat the eggs and sugar: In another bowl, whisk together the eggs, sugar and a splash of vanilla extract until they’re thick, pale and airy. This is where the magic happens. you’re building the structure for the fondant. It’s fun to watch how the mixture changes in texture as you beat it.
- Combine everything: Gently fold in the melted chocolate and butter mixture into the eggs and sugar. Then sift in the self-raising flour and a pinch of salt. Give it a few folds until everything is incorporated. You want the batter to stay airy, so go easy here.
- Fill the ramekins: Spoon the batter into your prepared ramekins but don’t overfill them-leave a bit of space at the top so they can rise and form that perfect little dome.
- Bake: Pop the ramekins on a baking tray and slide them into your preheated oven. Bake for around 10-12 minutes, depending on how gooey you like your center. For a runny center, 10 minutes should do but if you want it a bit firmer, leave it for an extra minute or two.
- Serve: Take the fondants out of the oven and let them sit for a minute or two before gently running a knife around the edge. Flip them out onto plates or serve them in the ramekins. Either way, they’ll be so delicious that no one will care what they look like!
A little dusting of icing sugar, maybe some whipped cream or fresh berries and you’re golden. It’s the sort of dessert that’ll have people going "How did you do that?!" when really, you just followed a simple recipe.
What I Learnt
The first time I made this, I’ll admit, I was a bit nervous. I mean, ’molten lava cake’ sounds like something that’s a little too fancy for a humble home kitchen, right? But Nigella’s recipe made it so approachable. One thing I learned was that timing is everything. The first time, I left it in the oven too long and ended up with a perfectly baked but non-molten, fondant. Still tasty but not quite the gooey center I was hoping for. The second time, I set an alarm and checked at the 10-minute mark and voila-pure magic.
Another thing I realized is how much less complicated fondants are compared to how they’re often portrayed. Yes, they sound like an intimidating dessert but they’re actually a bit of a breeze when you break it down. It’s a great dessert to impress friends or for a special occasion without having to spend your whole day in the kitchen. I love how the recipe doesn’t require too much precision. Nigella’s vibe is about creating something that tastes incredible and feels personal. no need for perfection.
FAQs
How Do I Make Sure The Center Of My Chocolate Fondant Is Gooey?
The key is timing! Nigella’s recipe usually bakes the fondants for about 12-14 minutes. Keep an eye on them; when the edges are set but the center still looks soft, that’s your cue to pull them out. Don’t overbake or you’ll lose that glorious gooey middle. Trust me, it’s the hardest part but the most rewarding when you get it right!
Can I Prepare The Chocolate Fondants In Advance?
Yes! You can prepare the fondants in advance by assembling the mixture and storing them in the fridge for a few hours, even overnight. Just pop them into the oven straight from the fridge and add an extra minute or two to the baking time. It’s a total game changer if you’re hosting a dinner party and want to impress your guests without the stress!
What If I Don’t Have Ramekins? Can I Use Something Else?
Definitely! If you’re out of ramekins, you can use muffin tins or any oven-safe dish that can hold the batter. Just be sure to butter and flour the dish well to prevent sticking. You might need to adjust the baking time depending on the size and depth of the dish you’re using, but the results should still be just as delicious!