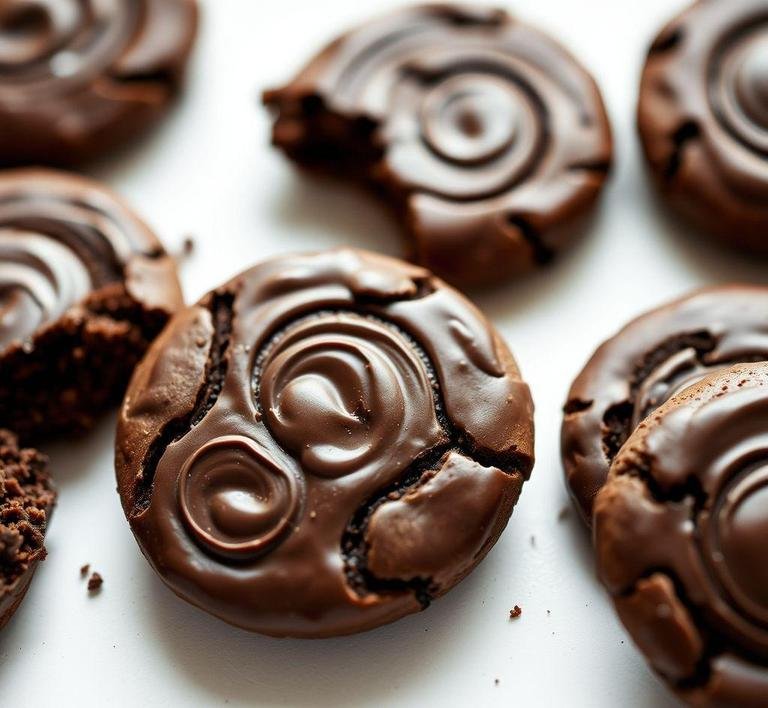
Ah, Nigella Lawson’s Chocolate Biscuits. they’re not quite cookies, not quite brownies but something beautifully in between. These biscuits (or cookies, if you’re in North America) are incredibly rich, gooey and indulgent. When I first came across the recipe, I thought it would be just another "chocolate biscuit" in a sea of hundreds. But, no – there’s something unique about Nigella’s version. It’s a no-bake recipe which means you’re not at the mercy of your oven’s temperature and you get to skip the typical baking process altogether. The result is a lovely, slightly crispy and wonderfully chocolatey snack that is, quite frankly, a game-changer. The biscuits themselves have the perfect balance of sweetness and bitterness from the cocoa while the texture is not just crunchy. there’s almost a slight chewiness to each bite. And you’ll be amazed at how much flavor is packed into such a simple recipe.
Nigella Chocolate Biscuits Recipe
Ingredients Needed
Here’s where things get beautifully simple. you won’t need a laundry list of obscure ingredients. This recipe is all about getting back to the basics with a few pantry staples that are probably sitting in your kitchen right now.
- Digestive Biscuits – These are the foundation of the recipe. They’re crumbly and just sweet enough but not overpoweringly so. If you can’t find Digestive Biscuits, you could use graham crackers or any mild-flavored biscuit that won’t compete with the chocolate too much. Trust me, I’ve experimented with a few variations over the years. The Digestives are the gold standard, though!
- Butter – No substitutions here. Butter is what gives the biscuits that melt-in-your-mouth richness. I’m a firm believer that butter makes everything better and Nigella certainly agrees.
- Cocoa Powder – Unsweetened cocoa powder is key. It adds that deep, chocolatey flavor, so don’t skimp on this one. I tend to use a good-quality cocoa powder, like Valrhona, because it brings out a richer flavor.
- Golden Syrup – This is where things get exciting. If you’re unfamiliar with golden syrup, it’s a thick, amber-colored syrup that’s a bit like honey but less sweet. You can find it at most supermarkets but if it’s unavailable, you could use corn syrup, though I do find golden syrup to have a slightly more complex flavor.
- Chocolate – Nigella calls for dark chocolate and I always follow this recommendation. It’s the right amount of bitterness to offset the sweetness of the butter and syrup. Dark chocolate holds its own in the mixture and gives that satisfying “bite” when you sink your teeth into the biscuits.
- Vanilla Extract – A dash of vanilla elevates the chocolate and even though it’s subtle, it rounds out the flavors perfectly.
If you’re like me, you might already have a couple of these ingredients tucked away in your pantry. Which means, really, the only thing standing between you and these biscuits is, well, you!
Equipment Needed
Now, let’s talk tools. This recipe is refreshingly low-tech which is part of its charm. There’s no need for mixers, fancy tools or anything too specific.
- A Mixing Bowl – Just a good-sized mixing bowl will do. I prefer using a glass or ceramic one since they hold the heat a bit better when melting the butter and chocolate. It just feels a little more cozy.
- A Spoon or Spatula. Something to stir with. A wooden spoon is lovely because it gives a rustic, hands-on vibe but any sturdy spoon or spatula works.
- A Saucepan – To melt the butter, chocolate and golden syrup together. I usually go for a medium-sized saucepan – nothing too fancy but big enough to comfortably melt everything without making a mess.
- A Tray or Baking Sheet – You’ll need something to spread your chocolate-coated biscuits on to firm up. I use a standard baking sheet, lined with parchment paper or a silicone mat, to make things easy to remove later.
- A Knife (optional) – If you’re feeling a little adventurous and want to make your biscuits extra special, you could chop up some extra chocolate or even add a sprinkle of sea salt on top once they’ve set. But that’s purely optional.
Instructions To Make Nigella Lawson’s Chocolate Biscuits
Okay, now the fun part. let’s get cooking (or, rather, melting and mixing). These biscuits come together in no time at all which makes them the perfect last-minute treat for a gathering or just a late-night snack.
-
Crush the Digestive Biscuits
Start by breaking up the Digestive Biscuits into small pieces. You can do this by hand (super satisfying) or by putting them in a bag and bashing them with a rolling pin (even more satisfying, I dare say). You want them to be small, uneven pieces. No need to pulverize them into crumbs. you want some texture.
-
Melt the Chocolate, Butter and Golden Syrup
Place the butter, chocolate and golden syrup in a saucepan over low heat. Stir occasionally and keep an eye on it so nothing burns. This is where the magic happens. the smell of the chocolate melting and blending with the buttery syrup is so good. Once everything is smooth and combined, take the saucepan off the heat.
-
Mix with the Biscuits
Pour the melted chocolate mixture over the crushed Digestive Biscuits and give everything a gentle stir. It should all come together beautifully. You want the biscuits to be completely coated with the chocolate mix. almost like a thick, chocolatey blanket. If it’s a bit too thick, you can add a tiny splash of water to loosen things up but I’ve never found it necessary.
-
Shape and Set
Now comes the tricky part (but not really). Spoon the chocolate-coated biscuit mixture onto your lined baking sheet. You can shape them into whatever you like – a log, a rough mound or even individual blobs (because who doesn’t love a chunky, rustic-looking biscuit?). Pop them into the fridge for at least an hour to set. Don’t try to rush this step. trust me, you want them to firm up properly.
What I Learnt
Every time I make Nigella’s Chocolate Biscuits, I’m reminded of just how simple ingredients can come together to make something truly magical. I’ve learned that the key to success here is patience. You might be tempted to eat them right away (they smell so good) but giving them time to set in the fridge really does make a difference in the texture and overall flavor.
Another little gem I’ve picked up is that these biscuits hold up beautifully over time. You can make them a few days ahead of a gathering and they’ll still taste great. In fact, I’ve found they get even better the next day as the flavors have a chance to meld and intensify.
FAQs
What Makes Nigella Lawson’s Chocolate Biscuits So Special?
Nigella’s chocolate biscuits are a perfect balance of crisp, rich chocolate, and a buttery, melt-in-your-mouth texture. It’s like biting into pure comfort! Her recipe doesn’t overcomplicate things, so you can whip them up in no time-and they never disappoint. The cocoa and chocolate chunks give them that extra indulgent kick.
Can I Make Nigella’s Chocolate Biscuits Gluten-free?
Absolutely! You can easily swap the regular flour for a good gluten-free blend. I’ve done it myself, and they come out just as amazing. Just be mindful of the flour type you choose, as some blends can be a bit heavier, so make sure to adjust the baking time slightly if needed.
How Long Can I Store Nigella’s Chocolate Biscuits?
Honestly, they don’t last long in my house, but if you want to make them last longer, you can store them in an airtight container for about 4-5 days. They might soften a bit, but I love them that way, too! If you want to keep them extra crispy, try popping them in the fridge, but I can’t promise they’ll last long enough for that to matter.