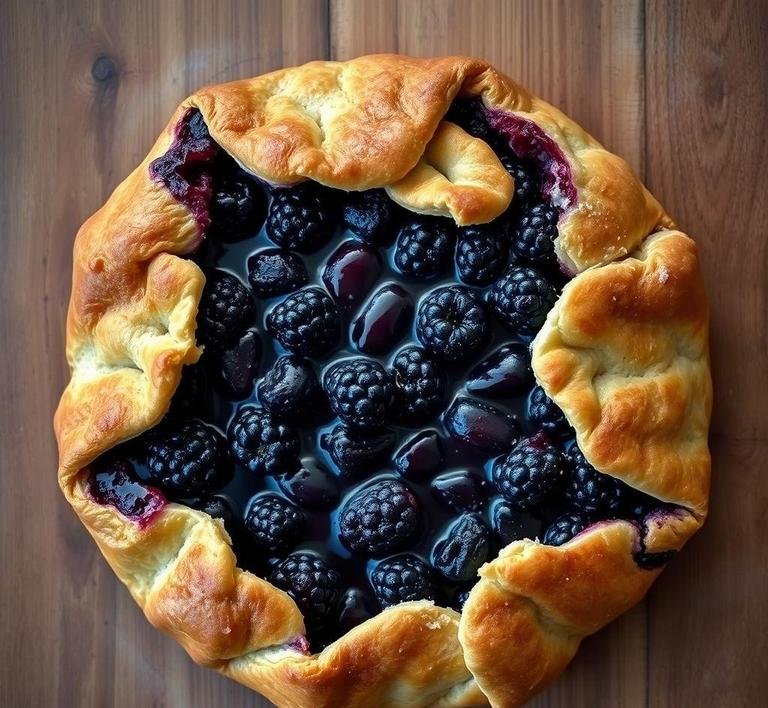
If you’ve ever felt the need for a simple, yet absolutely indulgent dessert that speaks to both rustic charm and refined flavor, then Nigella Lawson’s Blackberry Galette is a revelation. A galette, in essence, is a free-form tart-a pastry that doesn’t require the precision of a classic pie but still delivers all the cozy, mouthwatering satisfaction you’d expect from a homemade dessert.
This particular version, created by Nigella, is all about the beautiful marriage between blackberries and buttery pastry. The beauty of it is in its unfussy nature: you’re not trying to impress with layers of intricate decoration or a perfect lattice. Instead, it’s about the fresh, bright sweetness of the fruit surrounded by a golden, flaky crust.
I remember the first time I made this, feeling a bit intimidated by the thought of baking with fruit. so often, fruit desserts can end up soggy or too sweet. But this one, Nigella promises, is about balance. The juicy blackberries shine without being too overwhelming, thanks to a slight touch of sugar and a hint of lemon. The dough, rich and crumbly, doesn’t just wrap around the fruit; it elevates it. There’s a surprising ease to it, too. It’s the kind of dish that feels like you’re channeling something elegant and sophisticated but in reality, it’s all about letting things come together naturally.
Nigella Blackberry Galette Recipe
Ingredients Needed
You don’t need much for Nigella’s Blackberry Galette and that’s one of the things that makes it so great. It’s a celebration of the ingredients, rather than requiring complex techniques or hard-to-find elements.
Here’s the shopping list:
- Blackberries (300g) – Fresh, ripe and plump blackberries are the star of the show. They’re naturally tangy and sweet and you want them at their peak of ripeness for the best flavor.
- All-Purpose Flour (250g) – This will make the base for the dough. If you have pastry flour, it will give you an even more delicate, tender texture but all-purpose works just fine.
- Butter (125g) – You want this to be cold and cubed. The butter is what makes the crust rich and flaky, so don’t even think about skimping on it.
- Icing Sugar (50g) – This is for the dough, adding a hint of sweetness.
- Cold Water (about 2 tablespoons). The water helps bring the dough together. I find that using ice-cold water really helps keep the dough from getting too soft.
- Lemon Zest (1 tsp). This adds a little lift to the blackberries, cutting through the richness of the butter while enhancing the fruit’s natural tang.
- Caster Sugar (75g) – For sprinkling over the blackberries to balance out their tartness.
- A pinch of Salt. To bring everything together.
- 1 egg (for glazing). This gives the galette a beautiful golden finish once baked.
Equipment Needed
Now, Nigella’s Blackberry Galette doesn’t require any fancy equipment or gadgets which is part of what makes it so approachable. Here’s what you’ll need:
- Mixing Bowls – A couple of them, for the dough and the filling.
- A Rolling Pin – For rolling out that lovely dough. Don’t fret if it’s not perfectly round. this is a rustic galette, after all.
- Baking Sheet – To bake the galette on. You’ll want it lined with parchment paper for easy removal and cleanup.
- Pastry Brush – To glaze the dough before baking which gives it that perfect, shiny finish.
- Sharp Knife – Just to slice the lemon zest and cut any excess dough. You don’t need any intricate tools for this dessert.
Instructions To Make Nigella Lawson’s Blackberry Galette
Making Nigella’s Blackberry Galette is one of those things that feels like pure magic in the kitchen. It’s almost as though you’re doing less and letting the ingredients do more. Here’s how it’s done:
-
Make the Dough:
Start by sifting your flour and icing sugar into a bowl. Add the cubed, cold butter. You can either use a pastry cutter or your fingertips to rub the butter into the flour until the mixture resembles fine breadcrumbs. Don’t overwork it as you want the butter to stay cold and in small pieces. This is the key to a flaky crust. Add a pinch of salt and just enough cold water (1-2 tablespoons) to bring it together into a dough. If it’s too sticky, add a little extra flour. Wrap the dough in cling film and chill it in the fridge for at least 30 minutes.
-
Prepare the Blackberries:
While the dough is chilling, prepare the blackberries. Toss them gently in a bowl with the caster sugar and lemon zest. Set aside.
-
Roll Out the Dough:
Once your dough is chilled, take it out and roll it out on a lightly floured surface. Aim for a circle about 25 cm in diameter but don’t worry if it’s a bit wonky. The beauty of a galette is that it’s meant to look rustic and imperfect. Transfer it onto your prepared baking sheet.
-
Assemble the Galette:
Pile the sugared blackberries into the center of the dough, leaving a bit of space at the edges. Fold the dough edges over the fruit, gently pleating it to form a rough crust. Don’t worry if the edges aren’t perfectly even. again, this is a rustic, homemade dish. Brush the dough with the beaten egg for a golden finish and then chill it in the fridge again for about 15 minutes to ensure the butter stays cold during baking.
-
Bake:
Preheat your oven to 200°C (180°C fan)/400°F. Bake the galette for 35-40 minutes or until the pastry is golden and the blackberries are bubbling away with their juices. The smell while it’s baking? Incredible. It’s a mix of warm butter and sweet, tangy fruit.
-
Serve:
Once it’s done, let it cool for about 10 minutes before slicing. It’s perfect served warm with a dollop of whipped cream or a scoop of vanilla ice cream if you’re feeling indulgent.
What I Learnt
The first time I made this galette, I was so nervous. I had this preconceived idea that fruit desserts would end up soggy or runny but this was an absolute game-changer. The blackberries stayed juicy but not overly wet and the crust? Absolutely glorious. Flaky, buttery and crisp with just the right amount of sweetness. I also learned that the rustic vibe of the galette is its strength-imperfection makes it beautiful and that’s such a refreshing mindset when baking. It’s a dessert that feels forgiving but still impressive.
I think what really struck me, though, is how Nigella makes everything seem approachable. She has this way of making you feel like, “I can totally do this”, even if you’re not an experienced baker. This galette was my entry into fruit-based desserts and since then, I’ve made variations with different fruits but this blackberry version is still my absolute favorite. It’s comfort in a dish, with just enough elegance to make it feel special.
FAQs
Can I Substitute The Blackberries With Other Fruits For This Galette?
Absolutely! While blackberries are the star here, you can swap them for other juicy fruits like raspberries, blueberries, or even mixed berries. If you go with something like peaches or pears, though, you might want to toss in a little extra sugar or zest to balance the sweetness. I once tried a pear version, and it turned out deliciously rustic – but the blackberries do give it that perfect tartness!
How Do I Keep The Galette Dough From Getting Too Soggy?
Ah, the dreaded soggy bottom! To avoid that, I recommend pre-baking the galette dough for about 10 minutes before adding the filling. Also, try not to overfill it with fruit – as tempting as that sounds. And, if you want to take extra precautions, sprinkle a little bit of semolina or cornstarch on the dough before adding the berries; it helps absorb the juices while keeping things crisp.
Can I Make This Galette Ahead Of Time And Reheat It Later?
Yes! You can make it a day ahead. Just let it cool completely, then wrap it in foil and store it in the fridge. When you’re ready to serve, pop it into a 350°F (175°C) oven for 10 minutes to warm it through. Honestly, I think the galette tastes even better the next day, once all those berry juices have really had time to meld with the buttery crust. I’ve served it at dinner parties, and it’s always a crowd-pleaser, no matter the timing!