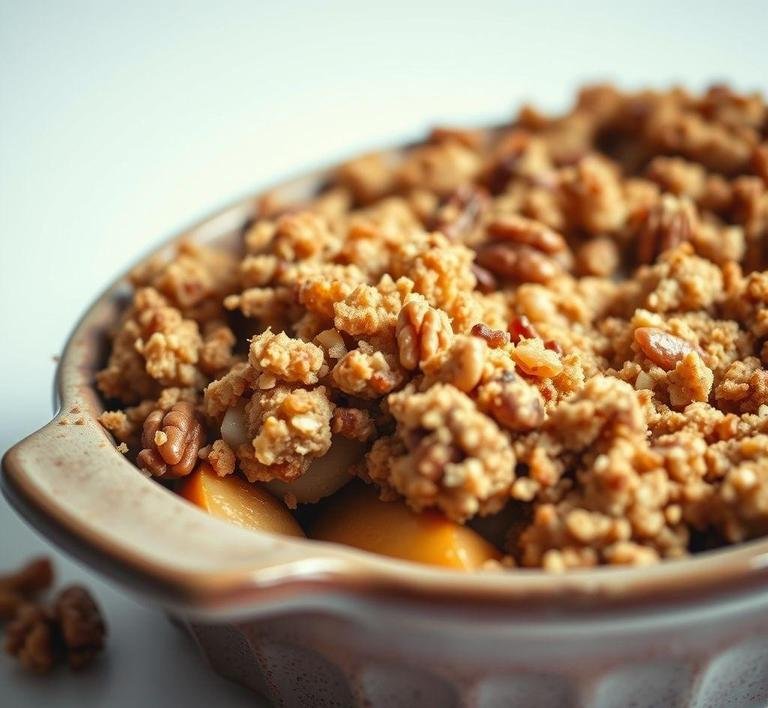
Okay, so let me set the scene for you: imagine you’re wrapped up in a cozy blanket, rain tapping on the windows and you’ve just pulled a warm, golden-brown crumble out of the oven. The scent of apples, cinnamon and toasted walnuts fills the air and you know you’re about to dive into something that feels both indulgent and comforting-kind of like a hug from the inside. That’s what Nigella Lawson’s Apple and Walnut Crumble is all about.
This recipe is a twist on the traditional apple crumble. Nigella has this magic way of elevating classic comfort food, making it feel just a little more special without being overly complicated. The addition of walnuts adds a nutty crunch and richness to the apple filling and the crumble topping itself is golden and slightly buttery. just enough to make each bite a little bit of heaven. If you’ve ever felt like the classic crumble was too simple or needed a little more depth, then this recipe is for you.
But what I love most about it is how Nigella makes the process feel so effortless. It’s a dessert that gives you the feeling you’re baking like a pro, even if you’ve never baked a thing in your life. There’s something so grounding and heartwarming about creating a dessert like this, where each ingredient feels like it belongs and the whole dish just comes together effortlessly. The best part? It’s versatile. You can serve it warm, cold or with a dollop of cream or custard, depending on how you’re feeling that day.
Nigella Apple And Walnut Crumble Recipe
Ingredients Needed
This is where I have to tell you, sometimes the simplest ingredients can create the most beautiful results. You won’t need to rush to a specialty store for any obscure items. these are the kinds of ingredients you’ll probably already have in your pantry. Here’s what you’ll need:
- Apples (preferably tart ones like Bramley or Granny Smith): The tartness of the apples is key. You want that bite that balances the sweetness of the crumble topping and the walnuts.
- Walnuts (chopped): The real hero here. Walnuts add that earthy, nutty depth that makes this crumble feel a little more special and substantial.
- Butter: Ah, butter. You can’t make a crumble without it! It gives that golden, slightly crisp topping that we all love.
- Sugar: A bit of caster sugar for sweetness in both the apples and the crumble topping. Brown sugar would work here too if you want that slight molasses-y flavor which I absolutely recommend.
- Flour: This is the backbone of your crumble topping. Plain flour works fine, though Nigella sometimes opts for self-raising flour to give the topping a little lift.
- Cinnamon: Just a sprinkle of cinnamon for warmth. Trust me, it’ll make your whole kitchen smell like a holiday.
- A pinch of salt: It’s like the unsung hero. Salt helps balance all the flavors.
- Lemon juice: A dash of lemon juice on the apples will brighten them up and keep them from turning too mushy.
That’s all! It’s the kind of recipe that you don’t need to run around collecting obscure ingredients for-it’s a pantry-friendly, cozy recipe that you can whip up any time.
Equipment Needed
Okay, let’s talk about equipment. This is the kind of recipe where you don’t need any fancy gadgets or gizmos. No stand mixers, no special pans, just basic kitchen essentials.
- Baking dish: You’ll need something to bake this crumble in, preferably a medium-sized ovenproof dish or even a small roasting pan. Nigella tends to go for a fairly shallow, wide dish, so you get that golden, crisp crumble topping all over.
- Mixing bowls: One for the apples and one for the crumble. Don’t worry, nothing fancy here. Just enough space to toss everything together.
- Sharp knife: You’ll need this for cutting your apples into the right-sized chunks. No need for precision but it’s good to get them in bite-sized pieces so they cook evenly.
- Grater (optional): If you want to zest a lemon (for an extra hit of freshness), you’ll need a fine grater.
- Wooden spoon or spatula: For stirring and mixing things together. You want to fold the ingredients, not beat them into submission. The crumble should be light and airy.
That’s it! Simple, right? Nigella doesn’t go overboard with equipment and it just makes the whole process feel more approachable.
Instructions To Make Nigella Lawson’s Apple And Walnut Crumble
Let’s dive into the good part. the making of the crumble. It’s a very relaxed process but it’s also one of those things where if you follow the steps, you’ll feel like you’re on a baking show. The steps are pretty straightforward, so here’s how you do it:
- Preheat your oven: Nigella suggests about 180°C (350°F). Make sure your oven is prepped and ready to go, so when you’re done assembling the crumble, you can pop it right in.
- Prepare the apples: Peel, core and chop your apples into bite-sized chunks. Toss them in a bowl with a squeeze of lemon juice, a tablespoon of sugar and a sprinkle of cinnamon. If you want to go extra (and who doesn’t?), you could even add a small splash of vanilla extract. Toss them around until everything is evenly coated, then set them aside.
- Prepare the crumble topping: In another bowl, mix together the flour, sugar and a pinch of salt. Take your cold butter and chop it into small cubes before adding it into the dry ingredients. Using your fingertips (yes, it’s messy but fun!), rub the butter into the flour and sugar until the mixture looks like breadcrumbs. You want it to be crumbly but with some larger pieces for texture. Finally, stir in the chopped walnuts for that perfect crunch.
- Assemble the crumble: Now, layer the apples in your baking dish, spreading them evenly. Scatter the crumble topping over the apples. Don’t pack it down. just let it naturally fall over the apples in clumps for the perfect crispy texture.
- Bake: Pop it into the oven for about 40-45 minutes or until the topping is golden brown and the apples are bubbling. It’s going to smell incredible and you might even find yourself opening the oven door every 10 minutes to check (because the anticipation is half the fun).
- Serve: Once it’s out of the oven, let it cool for just a bit before serving. I’d recommend serving it with vanilla ice cream or custard but whipped cream works if you want something lighter. If you’re feeling decadent, a scoop of both wouldn’t hurt.
What I Learnt
I’ll be honest: the first time I made this crumble, I was a little worried about the walnut addition. I mean, walnuts in a crumble? It seemed a little… out of left field for me. But then I tasted it. The nutty, almost toasty flavor of the walnuts, combined with the sweetness of the apples, completely changed my perception of what a crumble could be. It’s a perfect balance of flavors and textures. The walnuts give the dish a richness that elevates the apples without overpowering them. It’s like a dance of flavors in your mouth.
Another thing I learned is that the crumble topping doesn’t have to be super uniform. Nigella’s instructions are clear that you should let it fall in uneven clumps. it’s these irregularities that create the perfect crispiness and texture. If you’re someone who stresses over evenness in baking, this is the recipe to let go of that and just embrace the charm of a rustic dessert.
And lastly, I learned that sometimes, the most simple ingredients can come together to create something truly special. It doesn’t have to be complicated and it doesn’t have to be over-the-top. Just a few basic things, treated with care, can turn into something incredibly satisfying.
FAQs
Can I Substitute Walnuts With Another Type Of Nut?
Yes, you totally can! If you’re not a walnut fan, try using pecans, almonds, or hazelnuts for a different flavor. Each will add its own character to the crumble, but walnuts give that nice, earthy touch that’s hard to beat.
How Do I Make The Apple And Walnut Crumble Topping Extra Crispy?
Great question! To get a super crispy topping, make sure to use cold butter and rub it into the flour and oats until it looks like coarse breadcrumbs. You can also sprinkle a bit of demerara sugar on top before baking for a lovely golden crunch.
Can I Prepare The Apple And Walnut Crumble Ahead Of Time?
Absolutely! You can assemble the whole thing, cover it, and pop it in the fridge until you’re ready to bake. It’s one of those recipes that actually gets better if it sits for a bit, letting the flavors meld together.