Nigella Lawson’s breakfast bars are the culinary equivalent of a warm hug on a rainy Monday. I remember the first time I made them. it was winter, the kind of crisp morning where you can see your breath indoors if someone left a window cracked overnight. I was craving something substantial, something that didn’t come out of a box or buzz in a microwave. That’s when I stumbled on Nigella’s recipe.
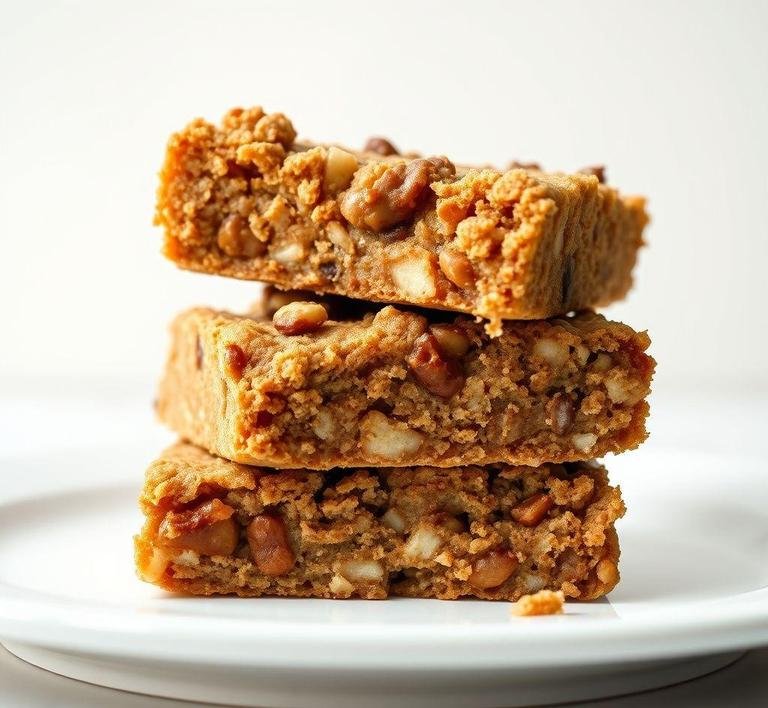
These bars are chewy, sticky, a little nutty, sweet in that maple-honey way and deeply satisfying. They’re like granola bars that decided to get dressed up for brunch. Think oats, dried fruit, seeds and a gloriously sticky binding of condensed milk that gives them that unmistakable homey richness.
What I love about them is how forgiving they are. You can riff on them endlessly. a bit of apricot here, a handful of almonds there. They’re perfect for rushed mornings when you need to grab something on the way out or when you just want to sit at your kitchen table, barefoot, with a hot cup of coffee and a moment to yourself.
Nigella Breakfast Bars Recipe
Ingredients Needed
Here’s where the magic starts. The ingredients list reads like a pantry hug. familiar and simple.
-
1 can (397g) of sweetened condensed milk
This is the glue. And the treat. If you’re like me, you’ve snuck a spoonful straight from the can more than once. No shame.
-
250g rolled oats
Don’t go for the instant kind. you want the real, hearty stuff. They’re the backbone of these bars.
-
75g shredded coconut
Adds that subtle tropical flair. I didn’t even like coconut growing up but now it feels like sunshine in a bite.
-
100g dried cranberries
Tart and jewel-toned. I’ve swapped these for raisins or chopped dried apricots when the cupboard demanded improvisation.
-
125g mixed seeds (sunflower, pumpkin, sesame. mix it up)
This is the crunch. These tiny bits are nutritional powerhouses. I love watching them toast up slightly in the oven.
-
100g natural unsalted peanuts (or chopped almonds, walnuts, etc.)
Go with what you love. I usually throw in whatever is leftover from my trail mix phase.
The beauty here is how customizable it all is. Nigella provides a solid base but the real joy comes from making it yours.
Equipment Needed
Nothing fancy here. This is the kind of recipe that rewards the everyday cook.
- A large mixing bowl. Big enough to mix everything without oats flying across the counter. (Been there.)
- A wooden spoon or spatula. Something with a bit of heft. You’re stirring thick, sticky ingredients.
- A square or rectangular baking tin. 23x33cm is ideal, lined with parchment paper. I’ve tried without once – never again. Trust me. Clean-up is a dream with the paper.
- A small saucepan – To gently warm the condensed milk.
- A good knife – For slicing those golden bars once they’re cool. And for sneaking slivers when no one’s watching.
Instructions To Make Nigella Lawson’s Breakfast Bars
Here’s where your kitchen starts to smell like happiness.
-
Preheat your oven to 130°C fan / 150°C conventional / 300°F.
The low heat ensures everything toasts gently and sets without drying out. It’s like baking in slow motion.
-
Warm the condensed milk in a saucepan.
Just until it’s runny and warm – not boiling. It turns silkier, easier to mix. I stand there stirring and inhaling. there’s something oddly calming about it.
-
Mix the dry ingredients in a large bowl.
Oats, coconut, dried fruit, seeds and nuts. toss it all together. This is where it looks like you’re making a bird feeder but hang in there.
-
Pour the warm condensed milk over the dry mixture.
Stir until every last oat is coated and clinging. It takes a bit of elbow grease. I always end up switching to my hands. It’s messy but it connects you to what you’re making.
-
Press the mixture into your lined baking tin.
Firm it down well. I use the back of a spoon – or a glass – to compact it. This step helps the bars hold together later.
-
Bake for about an hour.
Your kitchen will start to smell like comfort and Sunday mornings. When the edges turn golden and the middle looks set, it’s done.
-
Cool completely before slicing.
I mean completely. I once cut them warm. they crumbled into chaos (still delicious but chaotic). Give them an hour. Then cut into bars, squares or however your heart desires.
What I Learnt
Every time I make these, I remember that cooking doesn’t have to be complicated to be meaningful. There’s a rhythm to it. warm, mix, press, bake. that quiets the noise.
I also learned the beauty of adaptable recipes. You can substitute, tweak and improvise based on what’s in your kitchen, your mood or what season you’re in. I once added a pinch of cinnamon and a handful of dark chocolate chunks in the fall. it was like biting into autumn.
But the biggest lesson? That breakfast can feel like a small act of self-care. These bars don’t just feed you; they center you. They say, ’Hey, I see you trying to hold it all together. here’s something just for you.
FAQs
What Makes Nigella Lawson’s Breakfast Bars Different From Others?
Nigella’s breakfast bars stand out because of their perfect balance of textures-chewy oats, crunchy nuts, and a subtle sweetness from honey and fruit. She uses ingredients that are simple but feel luxurious, like the touch of golden syrup, which adds a comforting richness. These bars also don’t need baking, so they’re the ultimate no-fuss snack. It’s like getting all the energy and comfort of a breakfast in one perfect, portable bite!
Can I Make These Bars Gluten-free Or Adjust For Allergies?
Absolutely! Nigella’s recipe is quite flexible. You can swap in gluten-free oats and adjust the mix-ins for any allergies. For example, if you’re avoiding nuts, try seeds like sunflower or pumpkin, or even a blend of dried fruits. The beauty of this recipe is that you can make it fit your needs without sacrificing the indulgent flavor and texture.
How Long Do Nigella’s Breakfast Bars Stay Fresh?
In an airtight container, they’ll last up to a week-though, let’s be real, they’re usually gone long before then! If you’re making them in bulk, you can freeze them for a couple of months. I’ve done this before when I needed a quick breakfast on the go, and they thaw really well. Just take one out the night before, and you’re good to go the next morning!