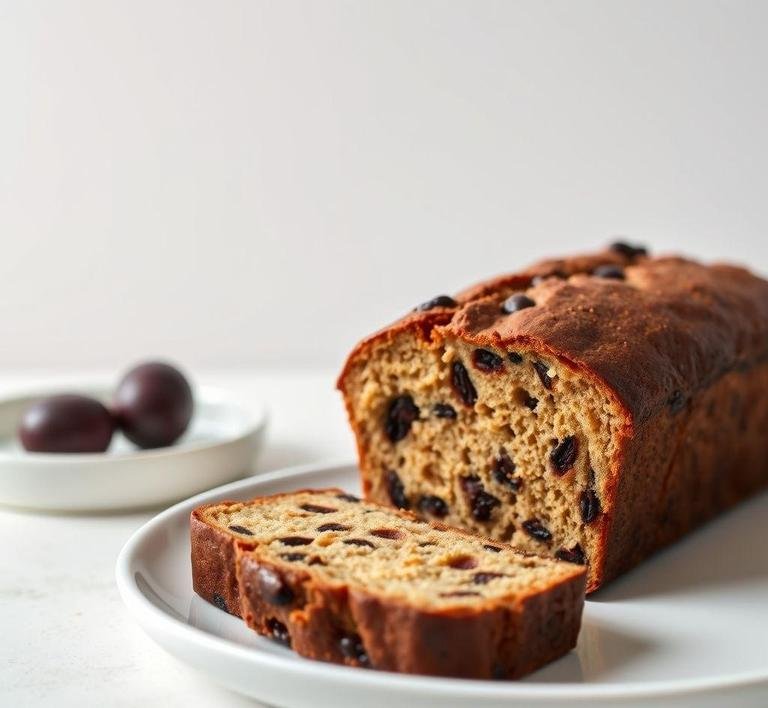
If you’ve ever found yourself curled up with a cup of tea, nibbling on something warm, sweet and comforting, there’s a good chance you’ve experienced the magic of bara brith. And if not, then I’m about to introduce you to one of the most glorious baked goods in the world, courtesy of the iconic Nigella Lawson.
Bara brith, traditionally a Welsh tea loaf, is a bit of a hybrid between a cake and bread. The name ’bara brith’ literally translates to “speckled bread”, a nod to the colorful mix of dried fruits that dot this loaf like little jewels. What makes Nigella’s version so irresistible, though, is her unorthodox yet brilliant addition of spices and the fact that she so gracefully balances the line between moist and sturdy. Each slice is a little hug for your taste buds-dense yet soft, sweet yet not overwhelmingly so, with just the right amount of fruitiness.
It’s the kind of cake you’d imagine eating in front of a crackling fire, wrapped in a cozy blanket, with rain pattering gently outside. Or, you know, on a lazy Sunday morning as the first cup of coffee steams beside you. You can dress it up with a slather of butter or eat it as it is. Either way, it’s comfort in loaf form.
Nigella Bara Brith Recipe
Ingredients Needed

One of the things I love most about Nigella’s bara brith is how unpretentious the ingredients are. There’s no rare spice or extravagant ingredient that’ll send you on a wild goose chase. It’s the kind of cake you can whip up without needing a trip to a specialist store.
Here’s what you’ll need:
- Mixed dried fruit: The classic blend of currants, raisins and sultanas gives the loaf its signature ’speckled’ look and a bit of chewiness. Nigella calls for about 350g in total. I often add a handful of chopped dried apricots for a bit of variety but that’s totally optional.
- Tea: In this recipe, the tea plays a starring role. It’s the ingredient that soaks into the dried fruit, softening and plumping it up. You’ll need a strong, brewed black tea-Nigella’s favourite is a good English Breakfast but you can use whatever you’ve got.
- Sugar: Dark brown sugar is used here to give the loaf depth and a bit of molasses-y richness. You’ll need about 100g.
- Butter: It’s bara brith, not bara dry. A good chunk of softened unsalted butter will keep the loaf wonderfully moist.
- Eggs: One large egg which binds everything together and gives the loaf some structure.
- Self-raising flour: A cup of this will help the loaf rise without being too airy, keeping it more bread-like in texture.
- Mixed spice: This is where the magic happens. A mix of cinnamon, nutmeg and sometimes cloves gives bara brith that unmistakable warmth. It’s like a hug in spice form.
- Baking powder: A little extra lift to make sure the loaf rises just right.
- Honey: A spoonful of honey in the batter adds a hint of sweetness and makes it even more luscious.
Simple, right? No outlandish ingredients, just the kind of pantry staples that most people have lying around.
Equipment Needed
You don’t need much to make Nigella’s bara brith either. I was honestly kind of surprised at how low-key the equipment requirements are for something that tastes so gourmet. Here’s what you’ll need:
- A large mixing bowl: This is for everything from soaking the fruit to mixing the batter.
- A wooden spoon or spatula: To gently mix everything together without overworking the batter.
- A loaf tin: Preferably one that’s around 2lb in size. It ensures the loaf holds its shape but isn’t too massive.
- A whisk: If you want to get all professional, you can use a whisk to beat the eggs and sugar together before mixing in the rest of the ingredients.
- A cooling rack: After the loaf comes out of the oven, you’ll want to let it cool down properly before slicing into it.
Honestly, the only thing you might find yourself needing is patience while that intoxicating smell fills your kitchen. But in terms of equipment, that’s all you really need.
Instructions To Make Nigella Lawson’s Bara Brith
Once you’ve gathered everything, it’s time to dive in and start baking. This recipe, like all great comfort foods, isn’t particularly difficult. but it does require a little time for everything to come together.
Here’s how I like to make it:
- Soak the fruit in tea: Start by placing your dried fruit in a large bowl and pouring over the freshly brewed tea. Let it steep for about 1 to 2 hours. It might seem like a small step but this is what makes the fruit plump and juicy, giving the loaf that sweet, soft texture. If you’re short on time, a 30-minute soak will still work wonders.
- Preheat and prepare the tin: Preheat your oven to 160°C (320°F) and line your loaf tin with baking parchment. This makes it easier to lift the loaf out once it’s baked and keeps the clean-up hassle-free.
- Mix the wet ingredients: In a separate bowl, whisk together the softened butter, sugar and egg until light and fluffy. Then stir in the honey for a touch of added sweetness and smoothness.
- Combine dry ingredients: In another bowl, sift together the self-raising flour, baking powder and mixed spice. The spice mixture is really key here-cinnamon and nutmeg make the whole kitchen smell like a fall dream.
- Add the fruit and dry ingredients: Stir the soaked fruit into the butter-sugar mixture, then gently fold in the dry ingredients. I find that using a spatula here is best as it helps you avoid overmixing. The batter should be thick and sticky.
- Bake: Pour the batter into your prepared loaf tin and smooth the top. Place it in the oven for about 1 hour and 15 minutes or until a skewer comes out clean. The aroma filling your house during this time is just something else. Make sure to check on it halfway through. if it’s browning too quickly, cover the top with foil.
- Cool and slice: Once baked, leave the loaf to cool in the tin for 10 minutes before transferring it to a cooling rack. Nigella suggests that the loaf tastes even better the next day as the flavours have time to develop. If you can resist cutting into it straight away (which, let’s be real, is tough), you’ll be rewarded with a perfect slice the following morning.
What I Learnt
Making Nigella’s bara brith taught me a few things. First, that patience is key. Letting the fruit soak in the tea, letting the loaf cool before cutting it. it all adds up to a much more delicious experience than rushing through. Secondly, I learnt that baking doesn’t always have to be about precision. Unlike other recipes that require exact measurements or techniques, bara brith feels forgiving. Even if you add a little extra spice or a handful of a different dried fruit, it somehow still turns out great. It’s a loaf that adapts to your own rhythm.
Finally, I learnt that food, especially something like this, is more than just sustenance. It’s a way to bring warmth to a moment. Sharing a slice of bara brith with someone or even enjoying it alone with a steaming mug of tea, feels like a little ritual, like carving out space in your day for something simple yet meaningful.
FAQs
What Makes Nigella Lawson’s Bara Brith Different From Other Recipes?
Nigella’s bara brith stands out because of its rich, aromatic flavor profile. She uses a mix of mixed dried fruit, tea, and warm spices like cinnamon and nutmeg, making it extra moist and flavorful. Plus, her simple yet effective soaking method makes the fruit plump and tender, creating a perfect, slightly sticky texture.
Can I Use Any Type Of Tea For Nigella Lawson’s Bara Brith?
Absolutely! While the recipe suggests using strong black tea (like Earl Grey or English Breakfast), feel free to experiment with different types. I’ve even made it with chai tea for an extra layer of spice, and it’s delicious. Just make sure the tea is strong enough to infuse all the flavors into the fruit.
How Long Will Nigella Lawson’s Bara Brith Last, And How Should I Store It?
Bara brith keeps surprisingly well. Once it’s fully cooled, wrap it in cling film or store it in an airtight container. It’ll stay fresh for about 4-5 days, though I’ve often found it even tastier after a day or two as the flavors deepen. You can also freeze it if you want to keep it longer-just slice it first for easy portioning later.


