Nigella Lawson’s Chocolate Birthday Cake with Condensed Milk isn’t just a dessert. it’s a celebration in every bite. This cake is the perfect balance between rich, gooey chocolate and the smooth, creamy texture of condensed milk. There’s something so luxurious about the way it comes together. no dry, crumbly crumbs here! It’s not too sweet but it hits that perfect spot of indulgence.
What’s so special about it, in my opinion, is that it’s a no-fuss, fail-proof recipe that actually feels celebratory. You know when you have that cake that just tastes like ’this is the cake’? That’s what this is. There’s a depth of flavor that’s rich but it’s not overly intense and the condensed milk adds an incredible richness that makes the cake feel almost… velvety. If you’ve ever had a cake that’s moist but also slightly dense in the best way, this is it.It’s the kind of cake that makes you feel cozy and loved.
I first came across this recipe when I was looking for something a little different to make for a friend’s birthday. something that wasn’t the usual ’light and fluffy’ type of cake. I’d read that Nigella was famous for her ability to make decadent, comforting foods with ease and this cake immediately caught my attention. It just sounded so… like a big, warm hug in dessert form. And let me tell you, it didn’t disappoint!
Nigella Chocolate Birthday Cake With Condensed Milk Recipe
Ingredients Needed
For a cake that feels this indulgent, you might think you need a million ingredients but the beauty of Nigella’s recipe is that it’s all relatively simple. Here’s what you’ll need:
For The Cake
- Butter (softened) – 225g: Butter is key to that rich, melt-in-your-mouth texture.
- Golden caster sugar – 250g: This fine sugar dissolves beautifully, giving the cake a soft crumb.
- Eggs – 2 large: These add structure, helping the cake rise.
- Self-raising flour – 200g: It gives the cake the perfect lightness. Don’t substitute this for plain flour unless you add baking powder.
- Cocoa powder – 75g: Make sure to use good-quality cocoa powder; it really impacts the flavor.
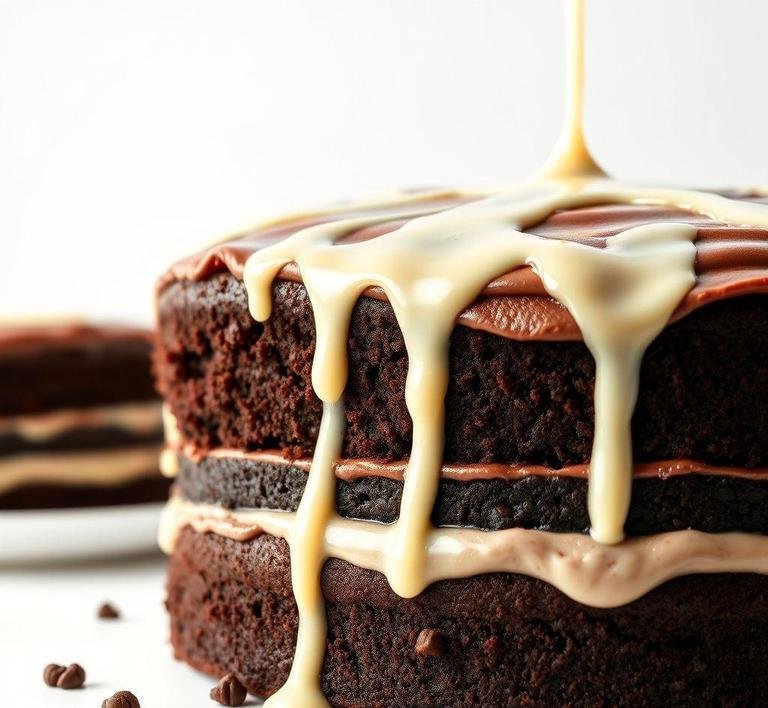
- Condensed milk – 397g tin: The star of the show! It makes the cake moist, rich and gives a delicate sweetness that balances the chocolate.
- Baking soda – 1 tsp: Helps the cake rise a bit more.
- Boiling water – 125ml: This helps dissolve the cocoa and ensures the cake has the perfect, slightly denser texture.
For The Icing
- Condensed milk – 120g: Yes, another helping of condensed milk! It gives the icing that beautiful, glossy finish.
- Butter – 50g: This ensures that the icing has that perfect creamy consistency.
- Cocoa powder – 30g: For the icing, you’ll need a little more cocoa to pack that rich chocolate punch.
- Icing sugar – 200g: Sweetens up the icing and gives it structure.
Equipment Needed
The equipment list is simple. nothing too fancy here! If you’re a fan of baking with minimal effort (who isn’t?), you’ll appreciate that you won’t need any weird gadgets.
- Mixer (stand mixer or hand mixer): You’ll need this to cream the butter and sugar. It helps make the batter smooth and lump-free.
- Measuring spoons and cups: Make sure everything is weighed or measured correctly.
- Cake tins: Nigella suggests using two 20cm round cake pans. They’re the perfect size for stacking the layers without having the cake come out too thin or too thick.
- Heatproof bowl: For mixing the cocoa and boiling water.
- Spatula: For scraping the sides and making sure you don’t waste any of that delicious batter.
- Wire rack: To cool the cake. You could just leave it in the tin but I promise, transferring it onto a rack gives you that clean, even cooling, so the icing doesn’t slide off.
Instructions To Make Nigella Lawson’s Chocolate Birthday Cake With Condensed Milk
Making this cake is almost therapeutic. The kind of recipe that you don’t feel rushed about and the steps aren’t complicated-just satisfying.
- Preheat your oven to 180°C (160°C fan). Line your two 20cm cake tins with butter and parchment paper. You want these layers to come out smoothly without sticking.
- Mix the dry ingredients: In a large bowl, whisk together your self-raising flour, cocoa powder, baking soda and golden caster sugar.
- Cream the butter and sugar: In your mixer bowl, beat the butter and sugar together until light and fluffy. This can take 4-5 minutes with an electric mixer. You want it to be pale and smooth. It’s like the base layer of happiness for the cake, seriously.
- Add the eggs: Crack the eggs in one by one, mixing well after each addition. If you’re worried about curdling, just add a spoonful of the dry ingredients to the mixture as you go.
- Incorporate the dry ingredients: Slowly add the dry ingredients to the butter mixture, alternating with the condensed milk. The condensed milk will give it that smooth, creamy consistency that makes the batter feel indulgent.
- Add boiling water: The batter will be thin, almost like a thick chocolate sauce but don’t worry. this is what makes it so moist later. Mix in the boiling water until smooth.
- Bake: Pour the batter evenly into your cake tins. Bake for 25-30 minutes or until a skewer comes out clean. The cake should rise nicely, with a firm but tender crumb.
- Cool: Let the cakes cool in the tins for about 10 minutes, then turn them out onto a wire rack to cool completely. I know the waiting feels like the hardest part but trust me, it’s worth it.
- Make the icing: While the cakes cool, you can start the icing. In a small pan, melt the butter and condensed milk together over medium heat. Stir in the cocoa powder and bring to a gentle simmer. Add the sifted icing sugar slowly until smooth. Let it cool slightly before spreading it onto your cooled cakes.
- Assemble the cake: Place one cake layer on a serving plate, spread some of the icing on top, then gently place the second cake layer on top. Spread the rest of the icing over the entire cake, letting it drape down the sides for that beautiful glossy look.
What I Learnt
I’ve made this cake a couple of times now and each time, I feel like it becomes a little easier, a little more intuitive. The first time, I was a bit unsure. would the condensed milk make it too sweet? Would it be too dense? I think I was overthinking it! The condensed milk really does give it that perfect balance of sweetness and the texture is incredibly soft and rich. The cocoa flavor still shines through which was something I was a little worried about but it’s the perfect backdrop to the creaminess.
Another thing I learned is that Nigella’s recipes are great for beginners and seasoned bakers alike. The instructions are straightforward but the end result feels professional. People will ask you if you bought it from a bakery. and it’s always a bit of a thrill to say, ’Actually, I made this.’
I also realized that this cake isn’t just a cake. It’s something you make when you want to show someone you care or when you want to treat yourself to something special. There’s something deeply comforting about the way it comes together and it’s become a go-to when I need something that feels like a celebration.
FAQs
Can I Use Regular Milk Instead Of Condensed Milk For Nigella’s Chocolate Cake?
While it might seem like a simple swap, condensed milk is much thicker and sweeter than regular milk. If you use regular milk, the texture and sweetness of the cake might be off. I’d recommend sticking with the condensed milk for that rich, moist cake that Nigella is known for!
How Long Does Nigella’s Chocolate Birthday Cake Last?
This cake stays fresh for about 3-4 days at room temperature, thanks to the condensed milk keeping it moist. If you have leftovers (lucky you!), you can wrap it up well and keep it in the fridge for up to a week. But honestly, it rarely lasts that long at my house!
Can I Freeze Nigella’s Chocolate Birthday Cake?
Yes! If you want to make the cake ahead of time, you can freeze it without the frosting. Just wrap it tightly in plastic wrap and then foil, and it’ll stay good for up to a month. Thaw it overnight in the fridge, then add the frosting before serving. It’s a great way to save time!